My Journey for X230 + Coreboot

After finishing the SMM blog, I picked up a Lenovo X230 for the next stage of the project. Until now, most of my experiments had lived inside QEMU. In this post, we finally leave the emulator behind, move onto real silicon :>
Connecting the BIOS Chip to the CH341A
For those who are not familiar with Coreboot, it is an open-source firmware project that can replace the vendor firmware on supported platforms. Instead of treating the machine’s early boot process as a black box, Coreboot gives us a much clearer and more controllable path from power-on to payload execution.
The moment you start touching firmware, you must assume that one bad image, one bad configuration, or one small typo can leave the machine unbootable. That is where the CH341A comes in. It is not just a convenient gadget, it is our insurance policy. By connecting an external programmer directly to the SPI flash chip, we can dump the original firmware, restore it later, and recover from mistakes without depending on the laptop to boot itself.
My Setup
Unlike the clip, i used the cables for the connection. Here’s my CH341A’s:
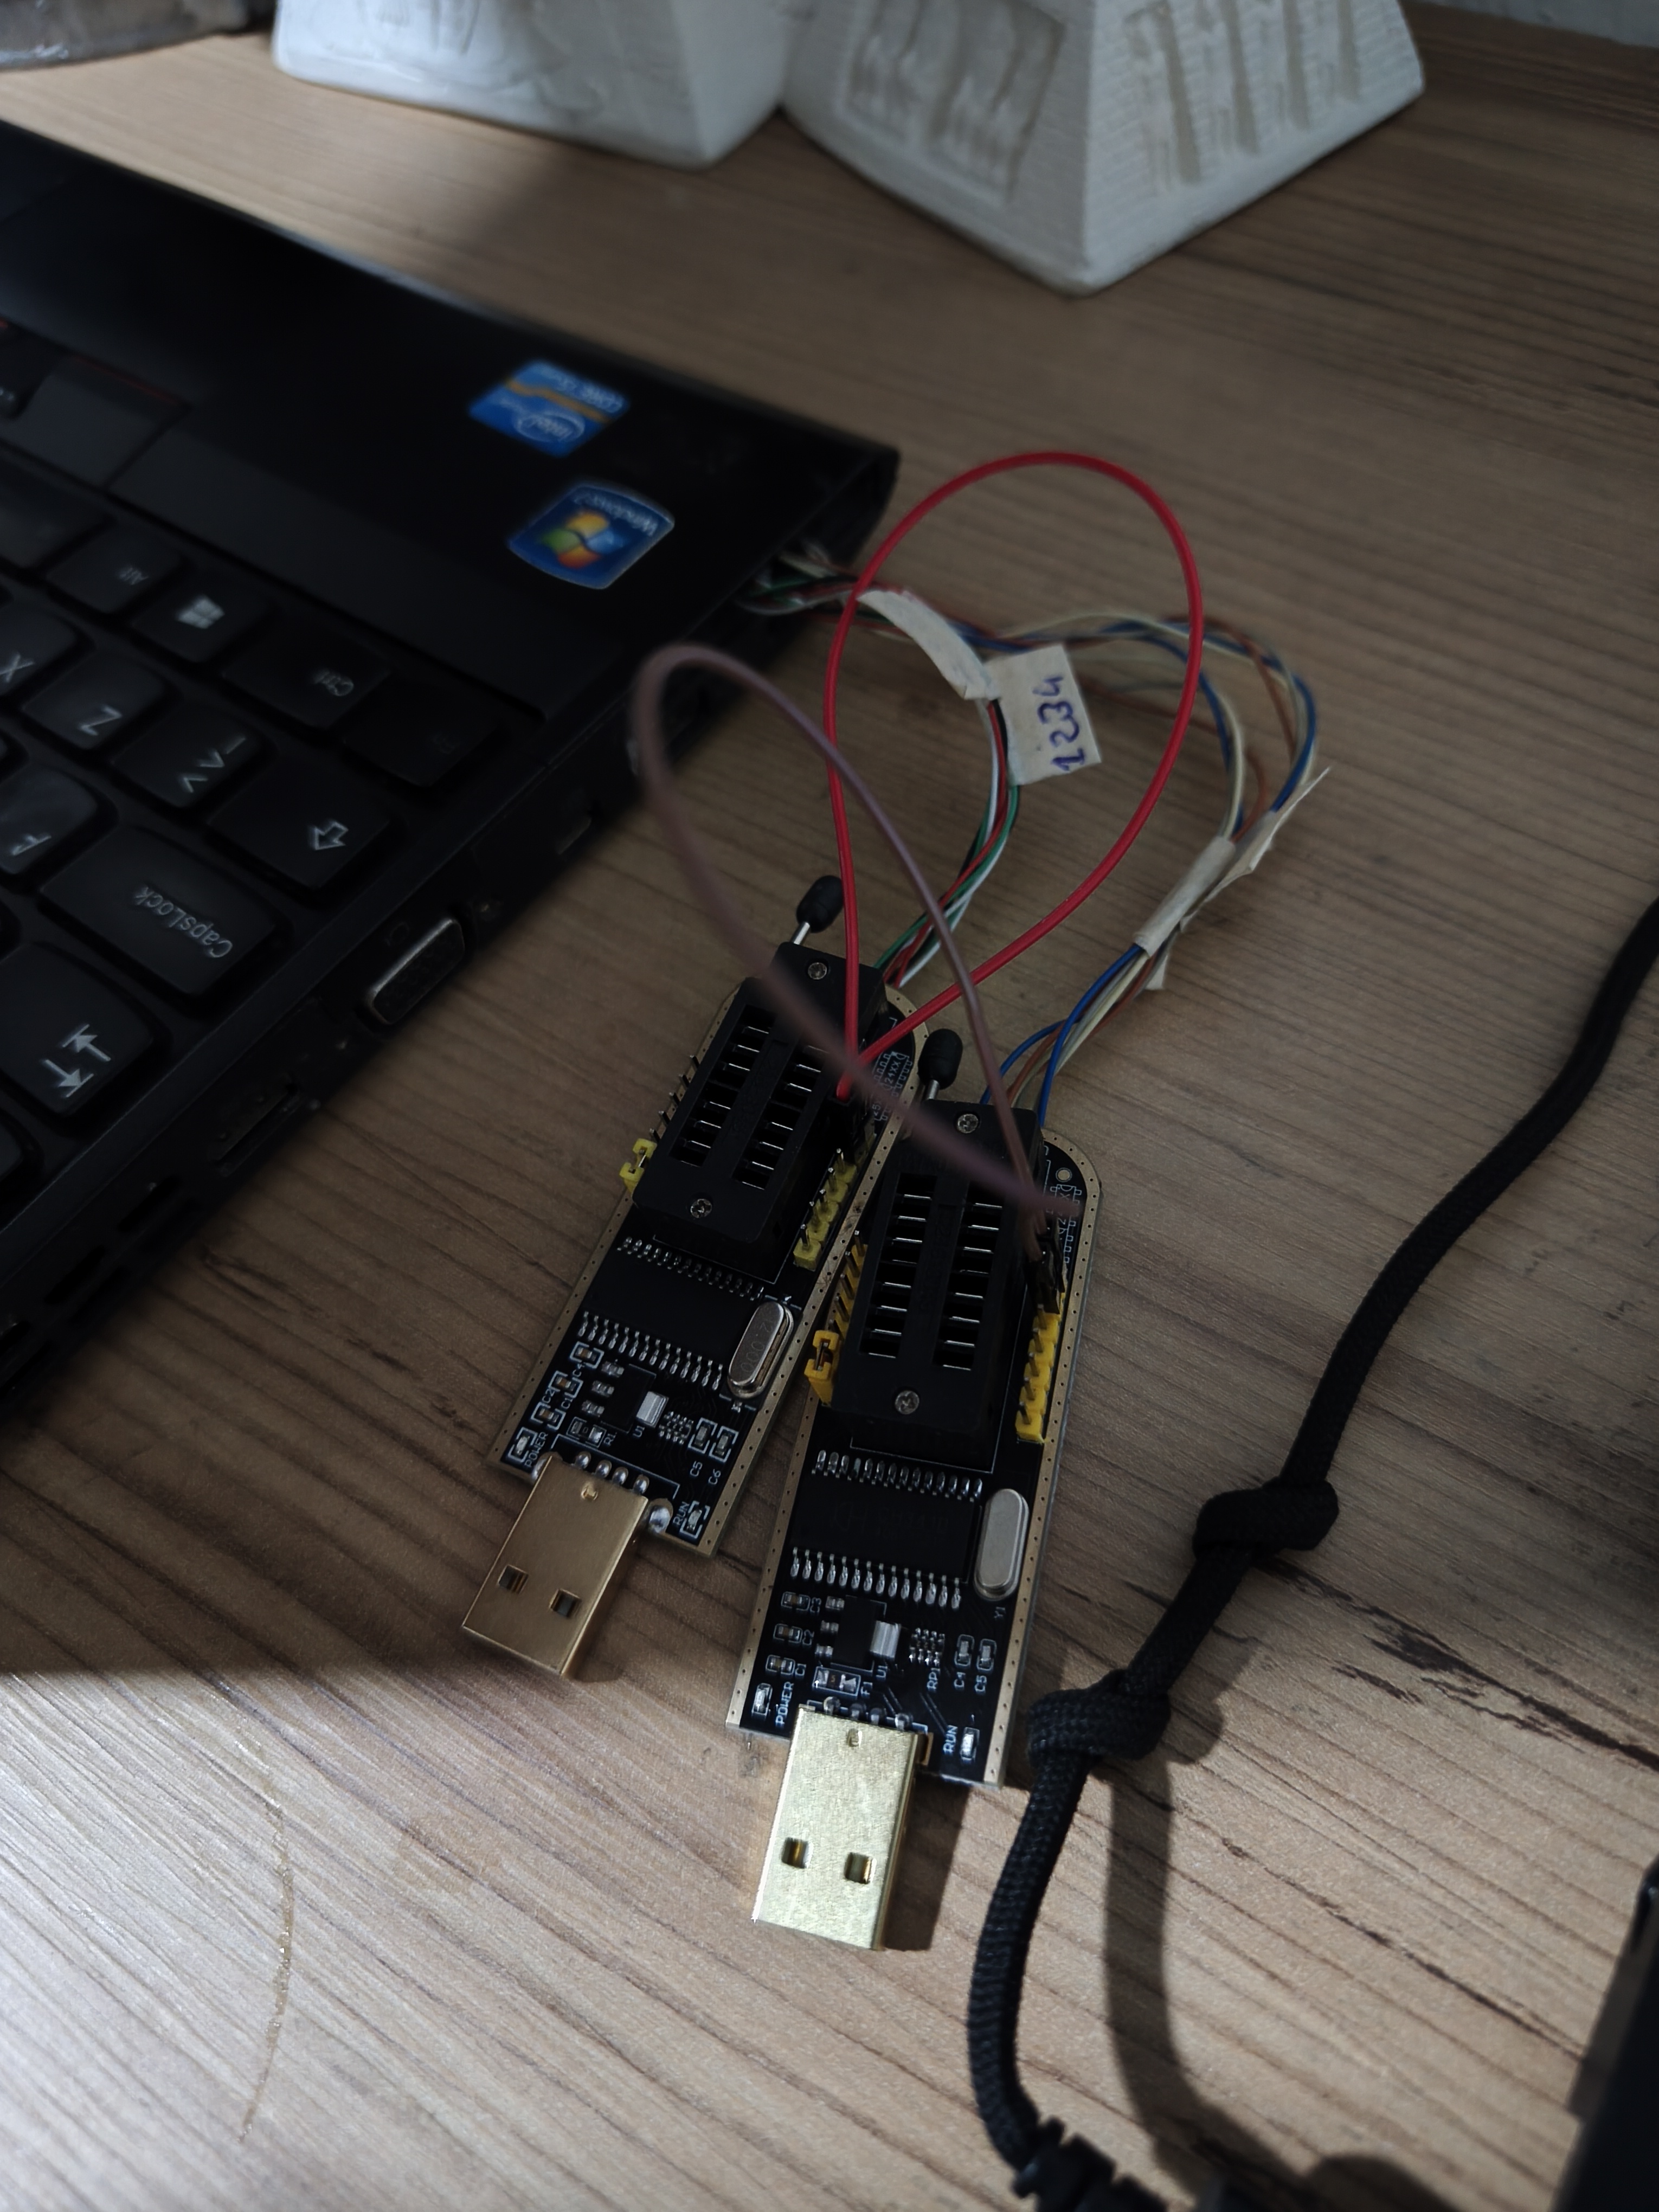
I soldered the chips pins because the Soic8 is really terrible; I had a hard time installing it on the chip and couldn’t get a clear result. Ponoma 5250 is considered a better alternative, but since it’s not sold in my country, I couldn’t use it:
In fact, this is really good solution, especially for the reading operations.
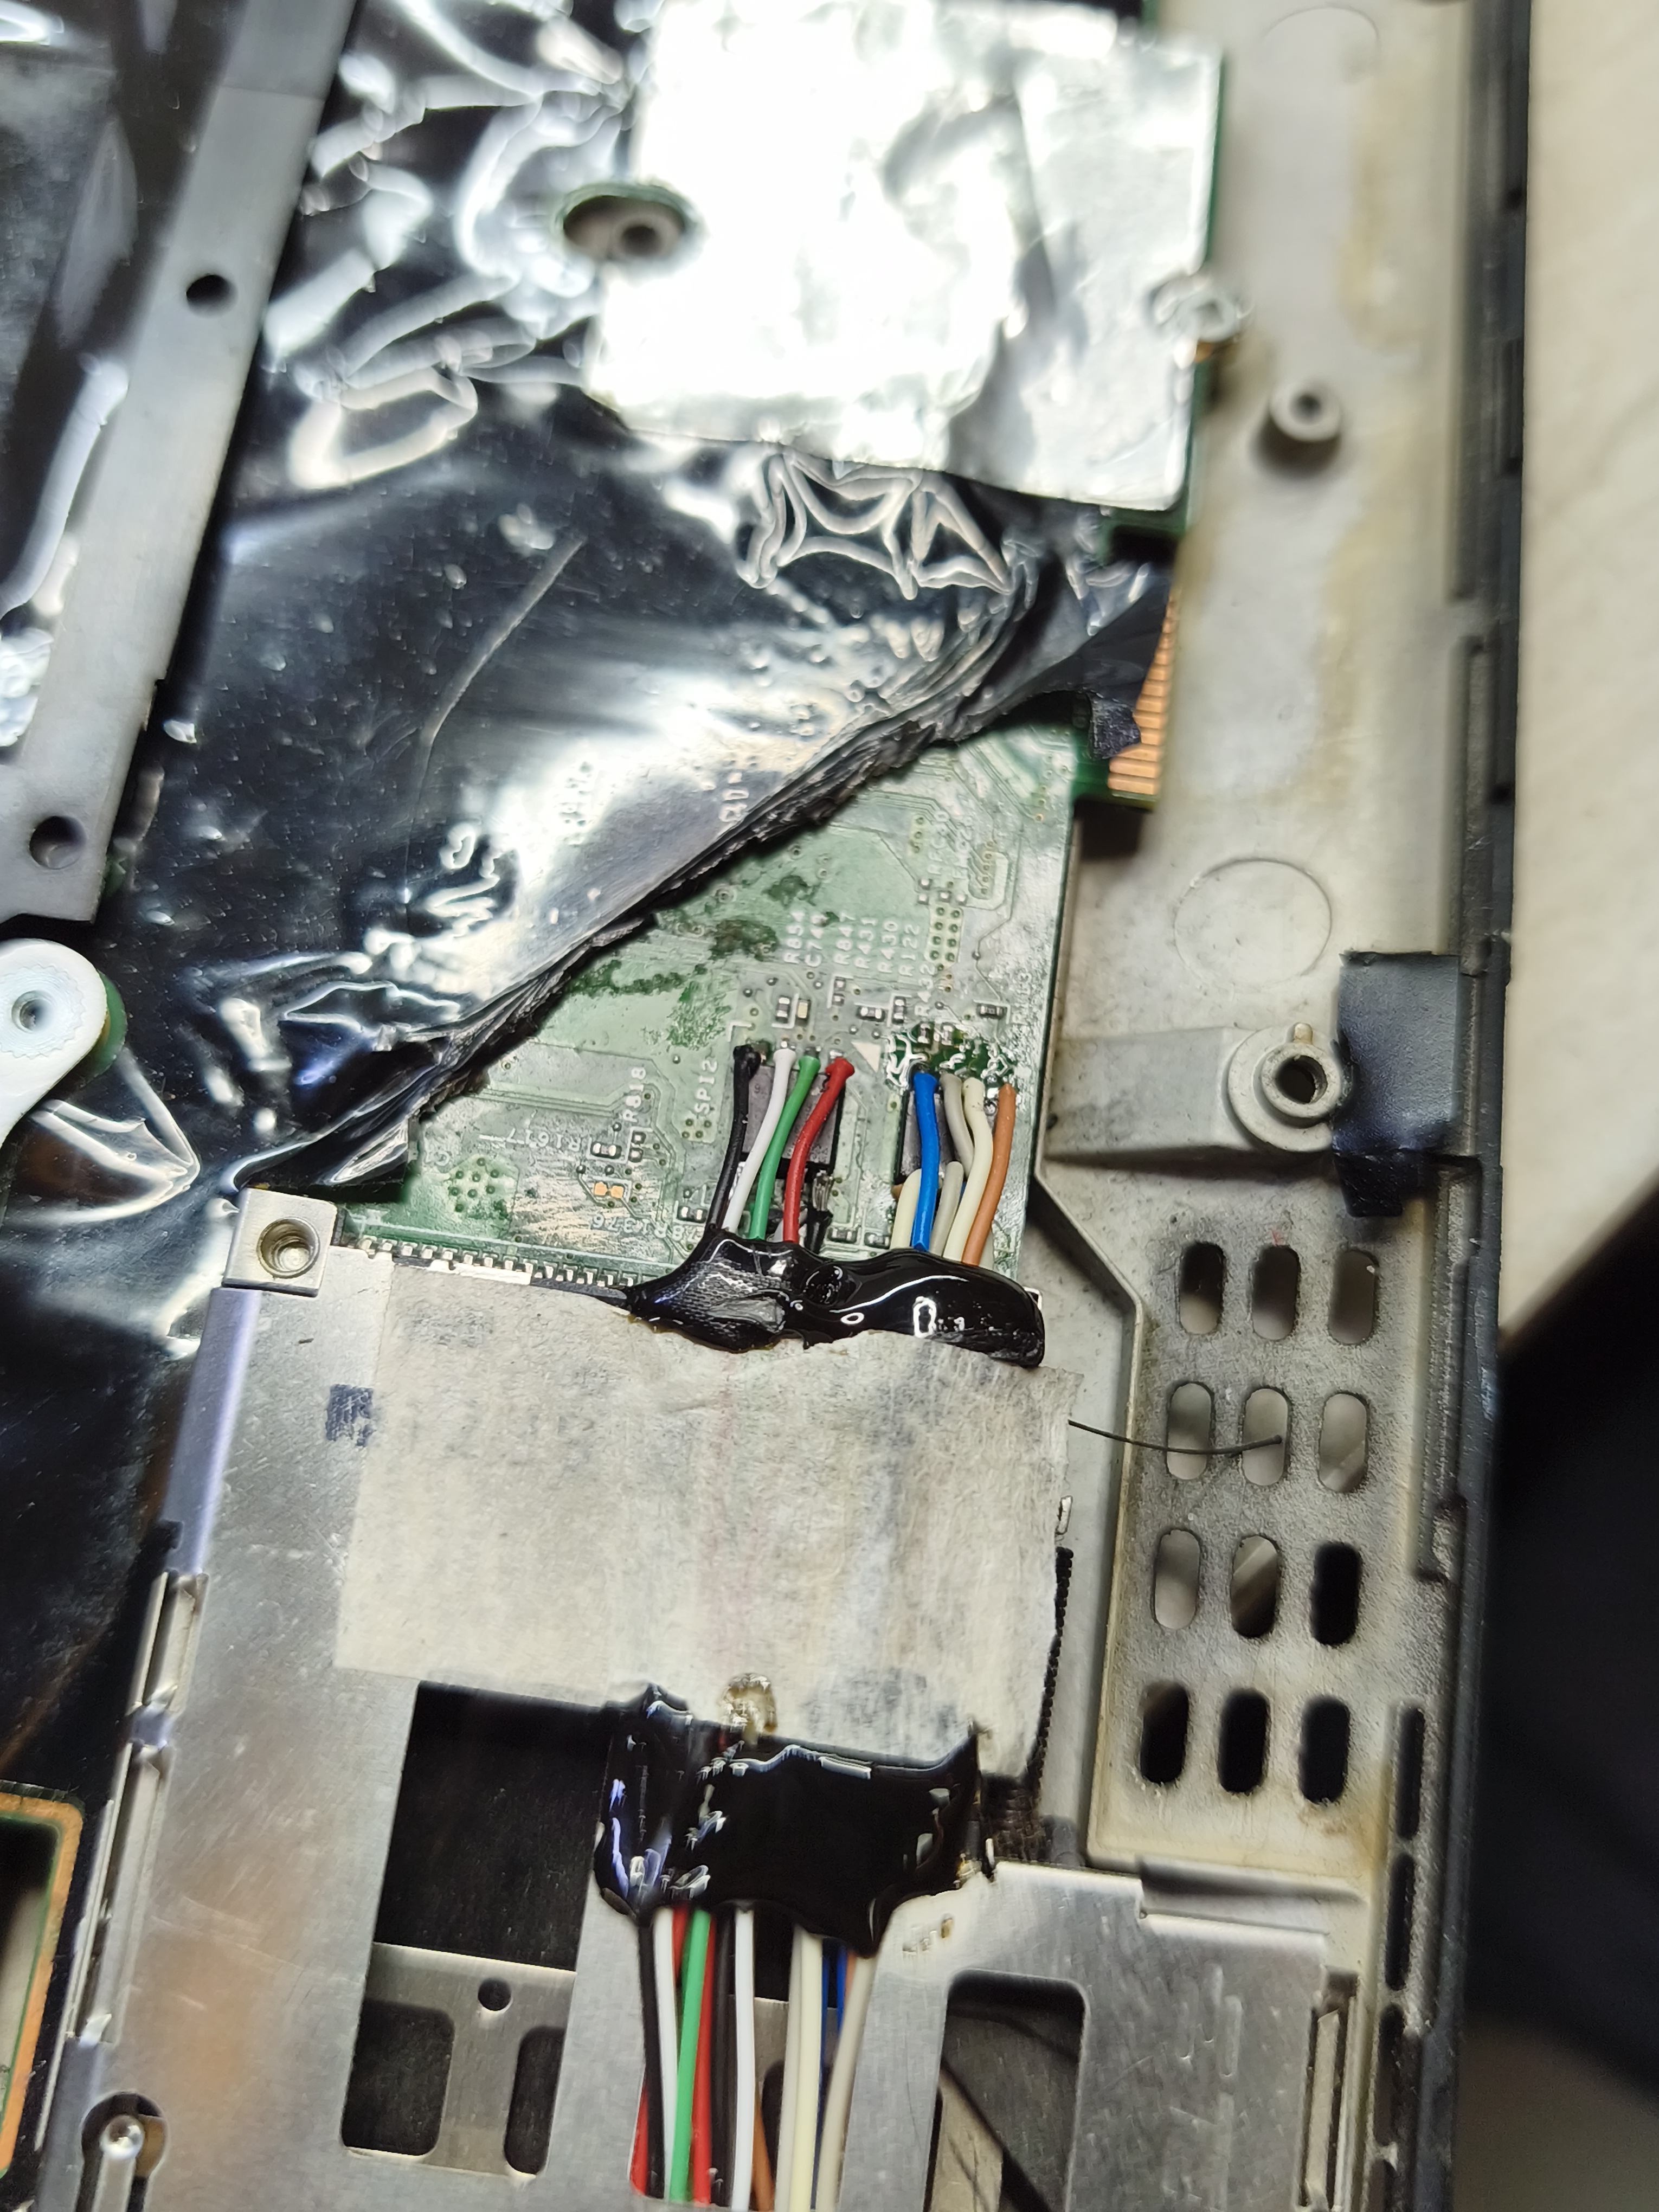
Backup the Chips
Before the coreboot itself, we will copy the chips, so that we can save our ass when we have a problem with the chips.
Unlike X220, the chips of the X230 are separated. Here’s a photo:
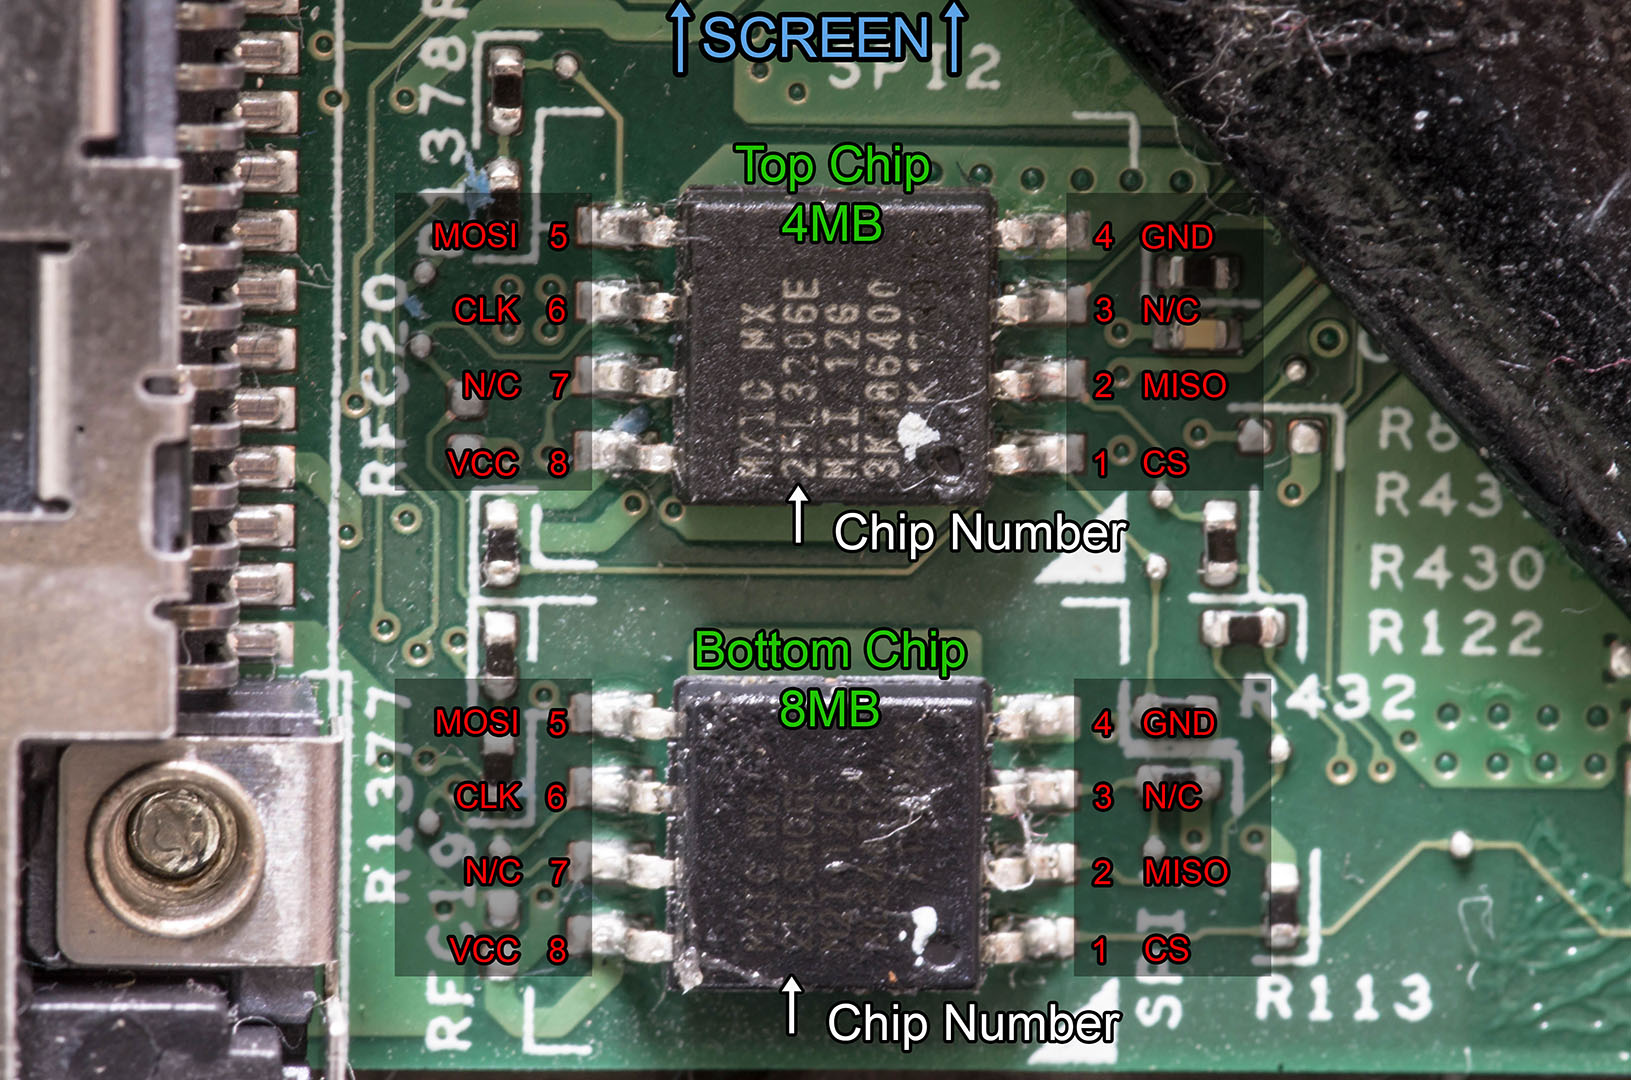
The top chip contains BIOS codes, while the bottom chip contains Intel Management Engine codes. In our case, we will write these two chips.
Top Chip
Let’s read the top chip:
bekoo@UbuntuOS:~/x230/coreboot$ sudo flashrom -p ch341a_spi
flashrom 1.4.0 on Linux 6.17.0-20-generic (x86_64)
flashrom is free software, get the source code at https://flashrom.org

Found Macronix flash chip "MX25L3205(A)" (4096 kB, SPI) on ch341a_spi.
Found Macronix flash chip "MX25L3205D/MX25L3208D" (4096 kB, SPI) on ch341a_spi.
Found Macronix flash chip "MX25L3206E/MX25L3208E" (4096 kB, SPI) on ch341a_spi.
Found Macronix flash chip "MX25L3273F" (4096 kB, SPI) on ch341a_spi.
Found Macronix flash chip "MX25L3233F/MX25L3273E" (4096 kB, SPI) on ch341a_spi.
...
In my case, the top chip of X230 is MX25L3206E/MX25L3208E. Find your chip and read the chip two times and check them:
bekoo@UbuntuOS:~/x230$ sudo flashrom -p ch341a_spi -r top1-backup.bin -c "MX25L3206E/MX25L3208E"
flashrom 1.4.0 on Linux 6.17.0-20-generic (x86_64)
flashrom is free software, get the source code at https://flashrom.org

Found Macronix flash chip "MX25L3206E/MX25L3208E" (4096 kB, SPI) on ch341a_spi.
Reading flash... done.
bekoo@UbuntuOS:~/x230$ sudo flashrom -p ch341a_spi -r top2-backup.bin -c "MX25L3206E/MX25L3208E"
flashrom 1.4.0 on Linux 6.17.0-20-generic (x86_64)
flashrom is free software, get the source code at https://flashrom.org

Found Macronix flash chip "MX25L3206E/MX25L3208E" (4096 kB, SPI) on ch341a_spi.
Reading flash... done.

bekoo@UbuntuOS:~/x230$ sha512sum top*
f77ca5cf2432b55d49d322bfe5f7f2fd796b2ddcd07dab7d11e3606c1661c1889bfb7e676698860242e7587d507eff43ee1dfc950f3bd3cc4090435bd90d00df  top1-backup.bin
f77ca5cf2432b55d49d322bfe5f7f2fd796b2ddcd07dab7d11e3606c1661c1889bfb7e676698860242e7587d507eff43ee1dfc950f3bd3cc4090435bd90d00df  top2-backup.bin
Everything is good! Now we can focus on the bottom chip.
Bottom Chip
The steps are same for the bottom chip:
bekoo@UbuntuOS:~/x230/coreboot/build$ sudo flashrom -p ch341a_spi
flashrom 1.4.0 on Linux 6.17.0-20-generic (x86_64)
flashrom is free software, get the source code at https://flashrom.org

Found Macronix flash chip "MX25L6405" (8192 kB, SPI) on ch341a_spi.
Found Macronix flash chip "MX25L6405D" (8192 kB, SPI) on ch341a_spi.
Found Macronix flash chip "MX25L6406E/MX25L6408E" (8192 kB, SPI) on ch341a_spi.
Found Macronix flash chip "MX25L6436E/MX25L6445E/MX25L6465E" (8192 kB, SPI) on ch341a_spi.
Found Macronix flash chip "MX25L6473E" (8192 kB, SPI) on ch341a_spi.
Found Macronix flash chip "MX25L6473F" (8192 kB, SPI) on ch341a_spi.
...
The bottom chip is MX25L6406E/MX25L6408E in my case:
bekoo@UbuntuOS:~/x230$ sudo flashrom -p ch341a_spi -r bottom1-backup.bin -c "MX25L6406E/MX25L6408E"
flashrom 1.4.0 on Linux 6.17.0-20-generic (x86_64)
flashrom is free software, get the source code at https://flashrom.org

Found Macronix flash chip "MX25L6406E/MX25L6408E" (8192 kB, SPI) on ch341a_spi.
Reading flash... done.

bekoo@UbuntuOS:~/x230$ sudo flashrom -p ch341a_spi -r bottom2-backup.bin -c "MX25L6406E/MX25L6408E"
flashrom 1.4.0 on Linux 6.17.0-20-generic (x86_64)
flashrom is free software, get the source code at https://flashrom.org

Found Macronix flash chip "MX25L6406E/MX25L6408E" (8192 kB, SPI) on ch341a_spi.
Reading flash... done.

bekoo@UbuntuOS:~/x230$ ls -la bottom*
-rw-r--r-- 1 root root 8388608 Apr 10 02:04 bottom1-backup.bin
-rw-r--r-- 1 root root 8388608 Apr 10 02:06 bottom2-backup.bin

bekoo@UbuntuOS:~/x230/backup$ sha512sum bottom*
4a54df60d3631369462fb3750a27ef07d75d2c7bb6bbbb4dd1a9007135dd2743c7c674fcd7f8b083cf05cb965cfcc01ac72a61a0be9eac26012882d1f186ab74  bottom1-backup.bin
4a54df60d3631369462fb3750a27ef07d75d2c7bb6bbbb4dd1a9007135dd2743c7c674fcd7f8b083cf05cb965cfcc01ac72a61a0be9eac26012882d1f186ab74  bottom2-backup.bin
Lastly combine them (for the coreboot):
cat bottom1.bin top1.bin > x230-bios.rom
Now we have the copies of the chips. This stage is done and we can focus on the coreboot.
Installing and Preparing Coreboot
We can install coreboot via git:
> git clone https://review.coreboot.org/coreboot && cd coreboot
> git submodule update --init --checkout
> make crossgcc-i386 CPUS=$(nproc)
> make crossgcc-x64 CPUS=$(nproc)
Now we need to extract the blobs from the backup’s. Firstly, compile the ifdtool from the coreboot:
bekoo@UbuntuOS:~/x230/coreboot$ cd util/ifdtool/
bekoo@UbuntuOS:~/x230/coreboot/util/ifdtool$ make
...
cc  ../ifdtool/ifdtool.o ../ifdtool/fmap.o ../ifdtool/kv_pair.o ../ifdtool/valstr.o -o ../ifdtool/ifdtool

bekoo@UbuntuOS:~/x230/coreboot/util/ifdtool$ ./ifdtool -x ../../../backup/x230-bios.rom
Warning: No platform specified. Output may be incomplete
File ../../../backup/x230-bios.rom is 12582912 bytes
  Flash Region 0 (Flash Descriptor): 00000000 - 00000fff
  Flash Region 1 (BIOS): 00500000 - 00bfffff
  Flash Region 2 (Intel ME): 00003000 - 004fffff
  Flash Region 3 (GbE): 00001000 - 00002fff
  Flash Region 4 (Platform Data): 00fff000 - 00000fff (unused)
bekoo@UbuntuOS:~/x230/coreboot/util/ifdtool$ echo *.bin
flashregion_0_flashdescriptor.bin flashregion_1_bios.bin flashregion_2_intel_me.bin flashregion_3_gbe.bin
Determine the offsets and prepare the files:
bekoo@UbuntuOS:$~/x230/coreboot/util/ifdtool$ ./ifdtool -x x230-bios.rom
File x230-bios.rom is 12582912 bytes
  Flash Region 0 (Flash Descriptor): 00000000 - 00000fff
  Flash Region 1 (BIOS): 00500000 - 00bfffff
  Flash Region 2 (Intel ME): 00003000 - 004fffff
  Flash Region 3 (GbE): 00001000 - 00002fff
  Flash Region 4 (Platform Data): 00fff000 - 00000fff (unused)

bekoo@UbuntuOS:$~/x230/coreboot/util/ifdtool$ echo *.bin
flashregion_0_flashdescriptor.bin  flashregion_1_bios.bin  flashregion_2_intel_me.bin  flashregion_3_gbe.bin

bekoo@UbuntuOS:$~/x230/coreboot/util/ifdtool$ mkdir -p ~/X230/coreboot/3rdparty/blobs/mainboard/lenovo/x230

bekoo@UbuntuOS:$~/x230/coreboot/util/ifdtool$ mv ~/X230/coreboot/util/ifdtool/*.bin ~/X230/coreboot/3rdparty/blobs/mainboard/lenovo/x230

bekoo@UbuntuOS:$~/x230/coreboot/util/ifdtool$ cd ~/X230/coreboot/3rdparty/blobs/mainboard/lenovo/x230

bekoo@UbuntuOS:$~/x230/coreboot/util/ifdtool$ rename 's/.{14}//' *.bin

bekoo@UbuntuOS:$~/x230/coreboot/util/ifdtool$ mv flashdescriptor.bin descriptor.bin

bekoo@UbuntuOS:$~/x230/coreboot/util/ifdtool$ mv intel_me.bin me.bin

bekoo@UbuntuOS:$~/x230/coreboot/util/ifdtool$ ls
bios.bin descriptor.bin gbe.bin me.bin
After these operations, run make menuconfig and select these options (for the source, check this page):
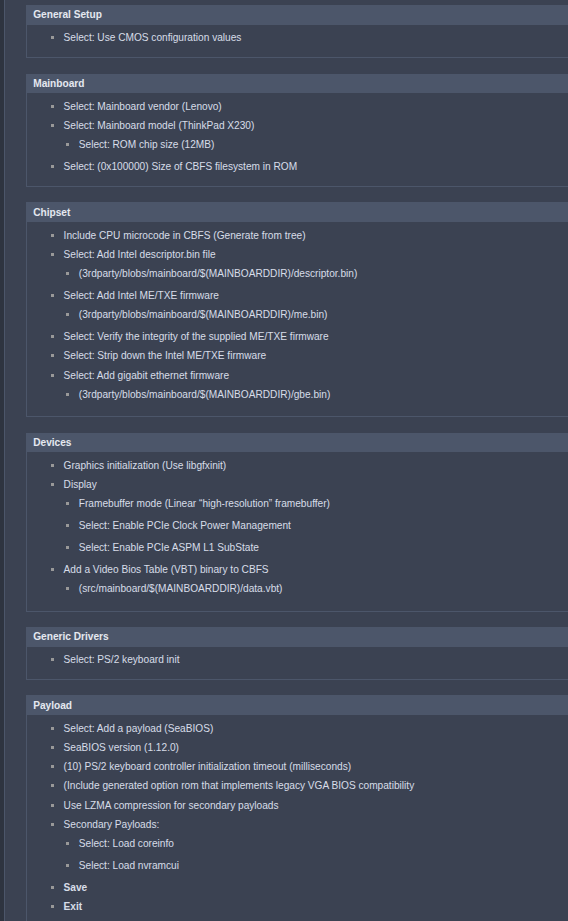
Note: Give 0x300000 value to Size of CBFS filesystem in ROm option.
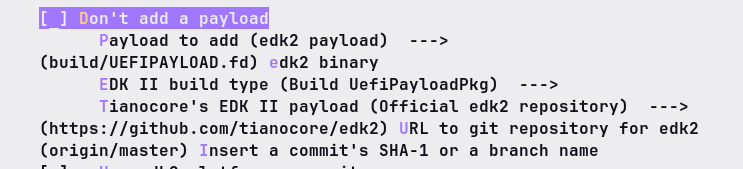
And since we will focus on EDK2, select the edk2 payload:
Save the options and exit. Now we are done!
Compile the coreboot with make -j$(nproc). After the operation, you should see this output:
FMAP REGION: COREBOOT
Name                           Offset     Type           Size   Comp
cbfs_master_header             0x0        cbfs header        32 none
cpu_microcode_blob.bin         0x80       microcode       26624 none
fallback/romstage              0x68c0     stage           95224 none
fallback/ramstage              0x1dd40    stage          131430 LZMA (281840 decompressed)
config                         0x3df00    raw              3657 LZMA (11732 decompressed)
revision                       0x3ed80    raw               774 none
build_info                     0x3f0c0    raw               104 none
fallback/dsdt.aml              0x3f180    raw             15058 none
vbt.bin                        0x42c80    raw              1433 LZMA (4281 decompressed)
cmos.default                   0x43280    cmos_default      256 none
cmos_layout.bin                0x433c0    cmos_layout      2012 none
fallback/postcar               0x43c00    stage           22892 none
img/coreinfo                   0x495c0    simple elf      43811 none
img/nvramcui                   0x54140    simple elf      51000 none
fallback/payload               0x608c0    simple elf     769650 none
(empty)                        0x11c780   null          1361956 none
bootblock                      0x268fc0   bootblock       24576 none

Built lenovo/x230 (ThinkPad X230)
Flashing Coreboot
Check the build file. You should see coreboot.rom:
bekoo@UbuntuOS:~/x230/coreboot/build$ ls -la | grep "coreboot.rom"
-rw-rw-r--  1 bekoo bekoo 12582912 Apr 10 05:21 coreboot.rom
Before the flash operation, we will split the rom because of the two chips:
> dd if=coreboot.rom of=coreboot-bottom.rom bs=1M count=8
> dd if=coreboot.rom of=coreboot-top.rom bs=1M skip=8
Now we can flash the coreboot.
Flashing Top Chip
bekoo@UbuntuOS:~/x230/coreboot/build$ sudo flashrom --chip "MX25L3206E/MX25L3208E" --programmer ch341a_spi --write coreboot-top.rom

Found Macronix flash chip "MX25L3206E/MX25L3208E" (4096 kB, SPI) on ch341a_spi.
Reading old flash chip contents... done.
Erasing and writing flash chip... Erase/write done.
Verifying flash... VERIFIED.
Flashing Bottom Chip
bekoo@UbuntuOS:~/x230/coreboot/build$ sudo flashrom --chip "MX25L6406E/MX25L6408E" --programmer ch341a_spi --write coreboot-bottom.rom

Found Macronix flash chip "MX25L6406E/MX25L6408E" (8192 kB, SPI) on ch341a_spi.
Reading old flash chip contents... done.
Erasing and writing flash chip... Erase/write done.
Verifying flash... VERIFIED.
You can now reassemble the laptop. Start the laptop and see the results:
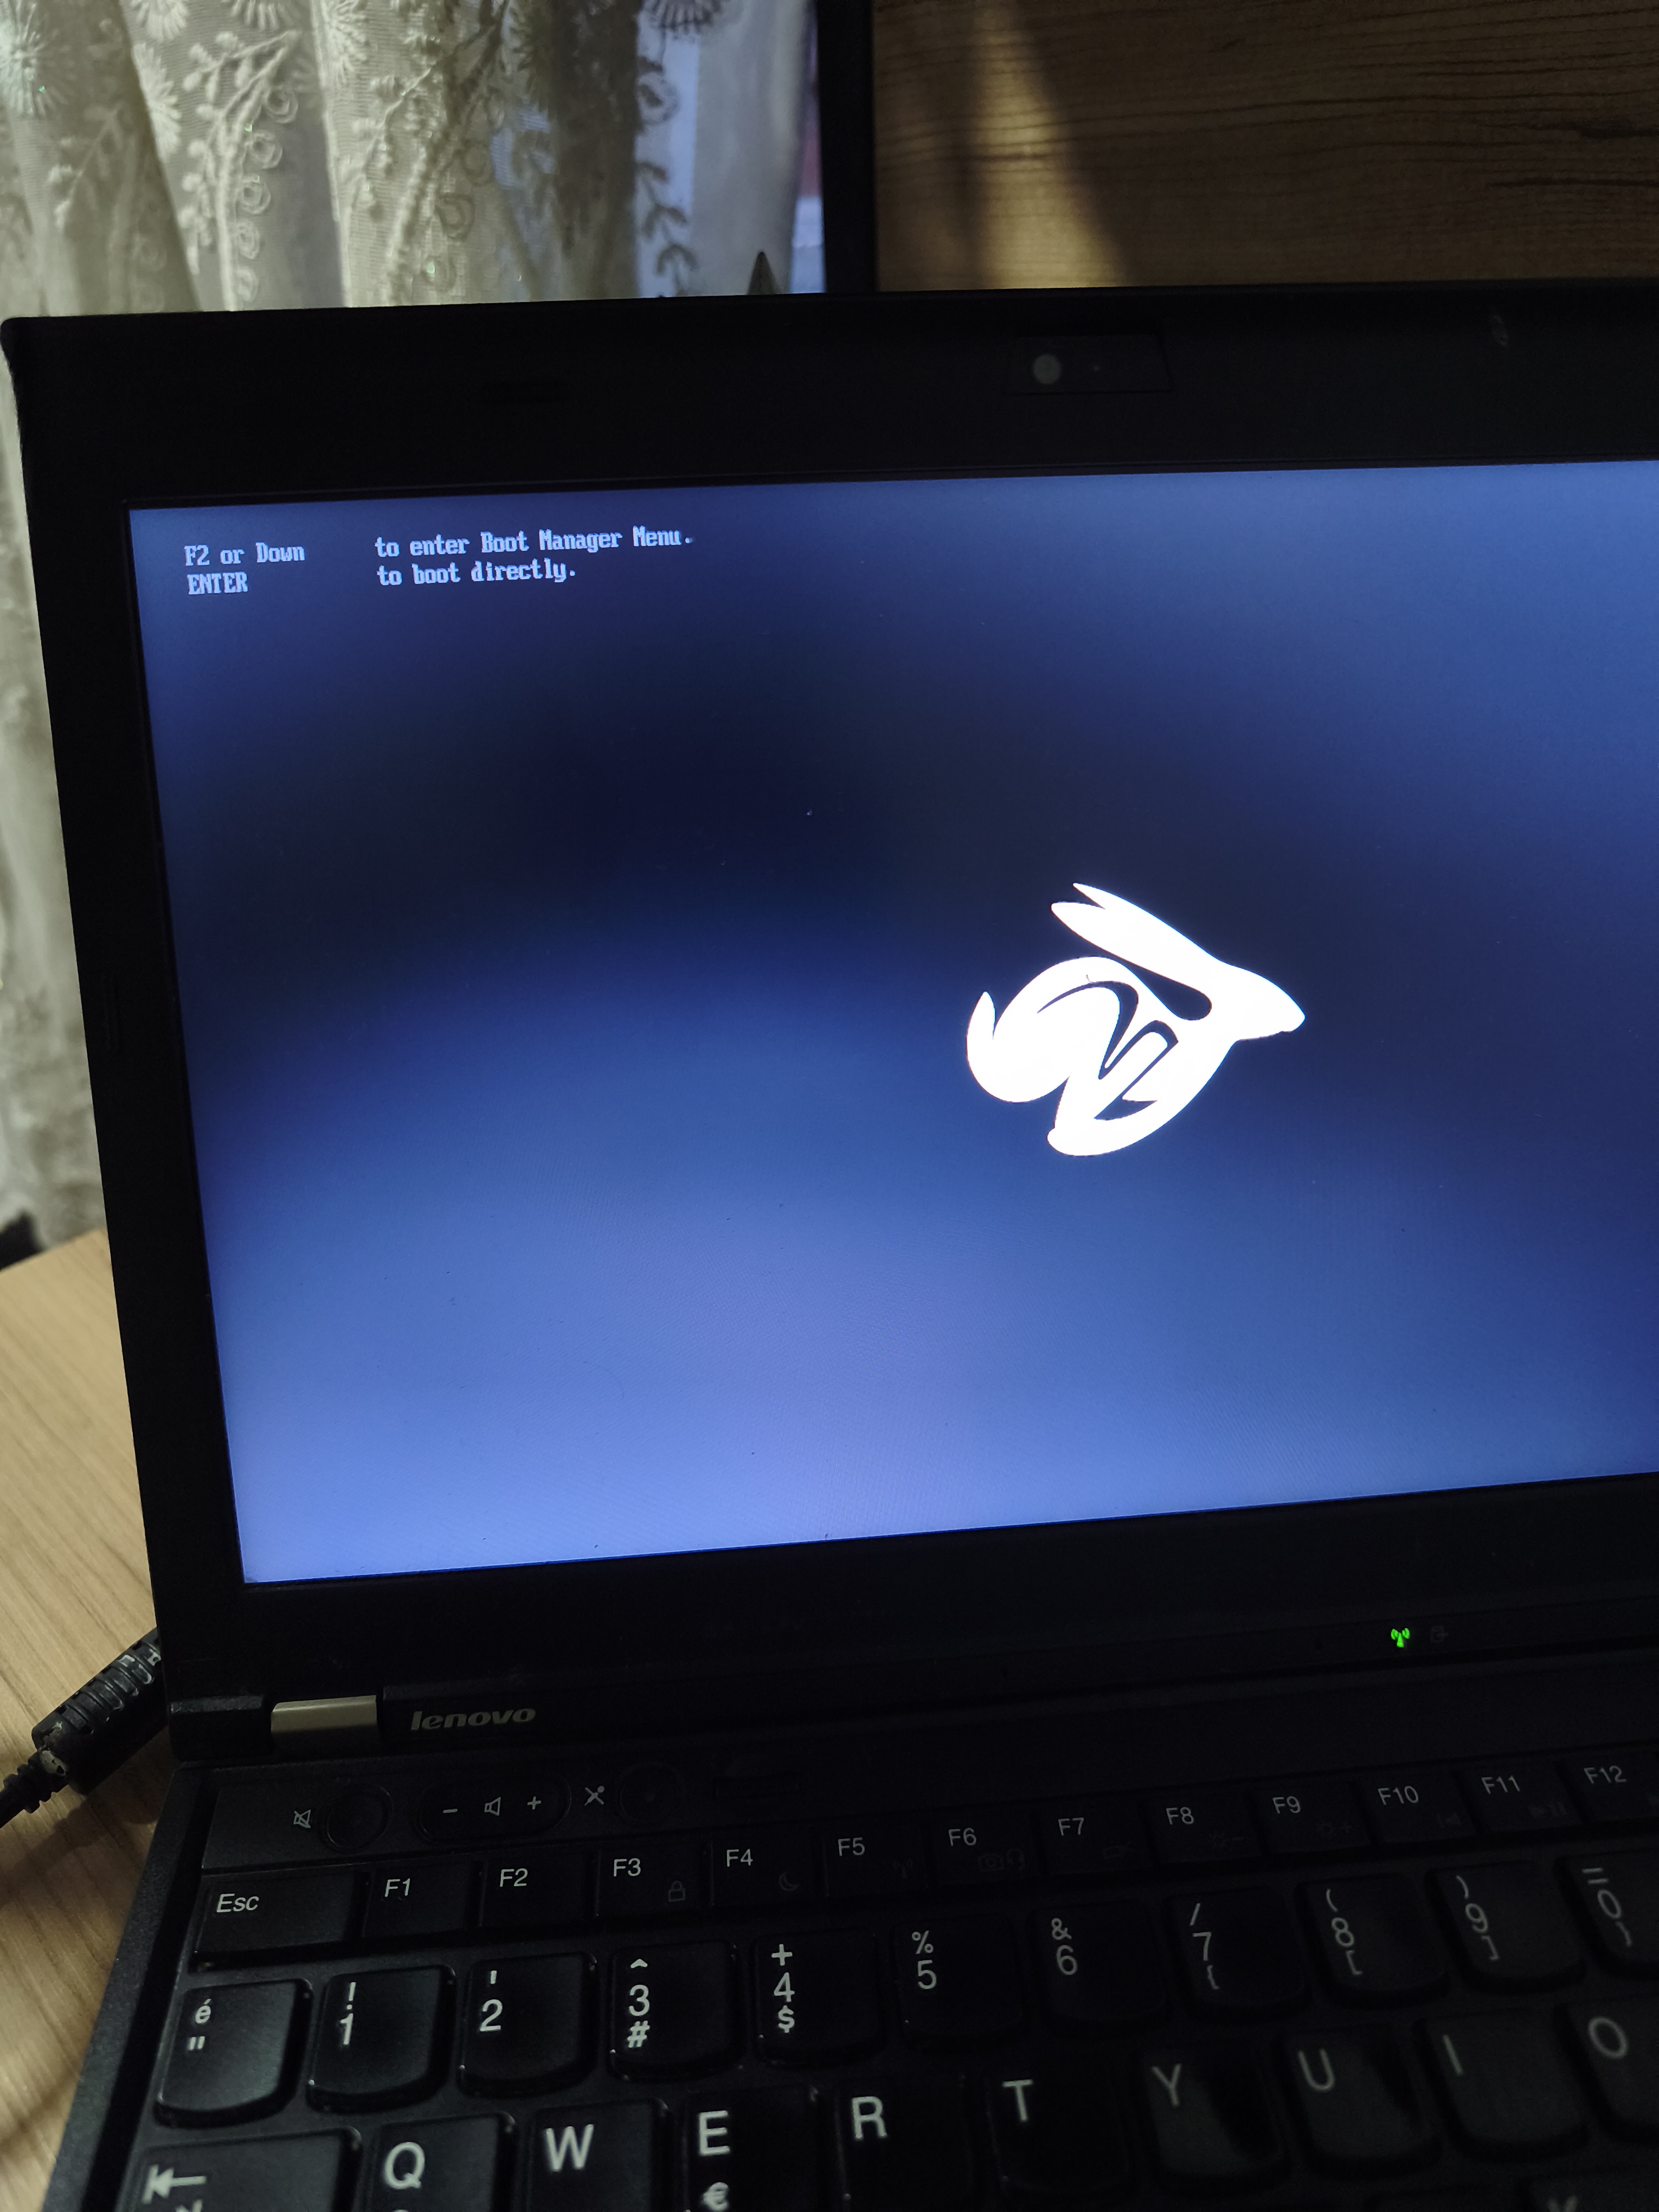
YEHUUU!