A Journey Into setup.exe — LabConfig and Windows 11 Security

Introduction
I recently submitted a security finding to MSRC. No CVE came out of it, no bounty — just something I thought someone at Microsoft should read. This blog is basically that report, rewritten in a way that makes sense to read outside of a submission form.
LabConfig has always caught my attention in Windows security research. Not as something to use, but as a question worth sitting with: how ethical is it, really, and what does it actually mean for security? That curiosity is what eventually led me to this research — and to building WhiteLotus. In this post, we’ll look at how bypass methods like LabConfig, now commonplace in everyday Windows 11 installs, quietly hollow out the security guarantees Microsoft built the operating system around.
Here’s the short version of the report: Windows 11 publicly guarantees that Secure Boot and TPM 2.0 protect your system out-of-the-box. The binaries that enforce those guarantees haven’t meaningfully changed since Windows 10. And there’s a registry path — one that millions of people have used to install Windows 11 on unsupported hardware — that makes those guarantees completely optional without ever telling the user.
The analysis covers winsetup.dll, setupcompat.dll, setupprep.exe, and winload.efi. I analyzed each one separately, and they all connect into the same chain.
LabConfig
Microsoft stated this about Windows 11:
“Windows 11 will stop these type of attacks out-of-the-box because we’re using Secure Boot and Trusted Boot, which use both the required UEFI and TPM hardware.”
— Windows 11 Security — Our Hacker-in-Chief Runs Attacks and Shows Solutions
Out-of-the-box. Not “when configured correctly.” Not “on supported hardware.” By default, as a guaranteed condition of running Windows 11.
So, LabConfig. It’s a registry path under HKLM\SYSTEM\Setup\LabConfig that Windows Setup reads during installation. It was originally introduced in Windows 10 for internal lab and deployment scenarios — test environments where hardware requirements don’t apply. It was never officially documented as a supported bypass method. It was never restricted, gated, or removed. It shipped into Windows 11 unchanged, and it still ships today.
When BypassSecureBootCheck and BypassTPMCheck are set to 1 under that key, the hardware verification functions in winsetup.dll return success without checking anything. No privilege gate, no audit trail — nothing beyond a setup log written to disk. And that log says, verbatim: “SecureBoot check bypassed in lab environment.” That exact string has been in every version of winsetup.dll shipped with Windows 11.
| Registry Value | Effect When Set to 1 |
|---|---|
| BypassSecureBootCheck | Skips the Secure Boot requirement check |
| BypassTPMCheck | Skips the TPM 2.0 requirement check |
| BypassRAMCheck | Skips the minimum RAM requirement check |
| BypassStorageCheck | Skips the minimum storage requirement check |
| BypassCPUCheck | Skips the supported CPU check |
A system installed this way doesn’t just lack Secure Boot at installation time — it enters a permanently degraded state that carries over to every subsequent boot:
- winload.efi sets BlVsmpSystemPolicy = 2 — a minimal stub. HVCI, Credential Guard, and Kernel DMA Protection never initialize.
- winload.efi skips SRK provisioning entirely — BitLocker cannot bind to the TPM.
- FvebpEndTpmBindingEx is called with skipPcrExtend = 1 — PCR11 is never extended, so BitLocker cannot verify the boot environment against TPM-sealed state.
- AllowUpgradesWithUnsupportedTPMOrCPU keeps the system receiving Windows 11 feature upgrades indefinitely, without ever satisfying the requirements that were bypassed at installation.
None of this is visible to the user. The system boots. Updates install. Windows 11 runs. The security posture Microsoft described as the defining characteristic of the OS simply isn’t there — silently, permanently, at scale.
Before getting into the code, I want to make something clear: LabConfig is not some obscure developer trick. It’s the single most widely recommended method for installing Windows 11 on hardware that doesn’t meet the official requirements.
YouTube tutorials demonstrating this bypass have accumulated millions of views. It’s covered in major tech outlets, GitHub gists, and Reddit. The tool Rufus — one of the most widely used USB creation utilities — exposes this bypass as a single checkbox, enabled by default for unsupported hardware:
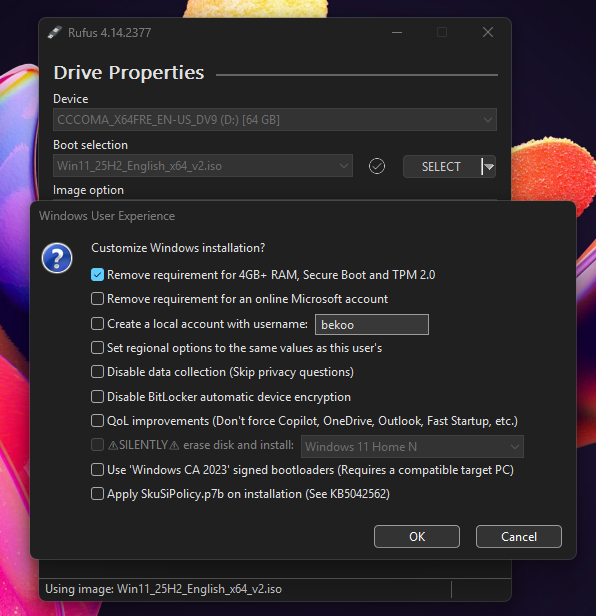
A single click. Many users enable this without knowing what they’re actually disabling. That’s the scale we’re talking about.
winsetup.dll — Where the Bypass Starts
winsetup.dll is the first place where LabConfig actually does its work.
When a user starts setting up Windows 11, ValidateHardwareRequirements runs. This is the function that checks whether all the required hardware features are present before installation proceeds:
WDS_EVENT_RESULT ValidateHardwareRequirements(WDS_CALLBACK_DATA *param_1, WDS_DATA *param_2) {
    [...]
    BOOLEAN Status = SelectedOSImageIsIotEnterprise();
    if (Status == 0) {
        Status = SelectedOSImageIsIotEnterpriseLTSC();
        if (Status != 0) {
            goto CheckRamRequirements; // Secure Boot and TPM checks skipped
        }
        // Normal path: all checks run
        Status = VerifyRAMRequirements(0);
        if (Status != 0 && VerifyProcessorSupported() != 0) {
            if (VerifySecureBoot() != 0) {
                VerifyTPMSupported();
            }
        }
    } else {
        // IoT Enterprise: Secure Boot and TPM checks skipped entirely
        goto CheckRamRequirements;
    }
There’s something interesting here already — when the image type is IoT Enterprise or IoT Enterprise LTSC, execution jumps straight to CheckRamRequirements, skipping both VerifySecureBoot and VerifyTPMSupported entirely. Let’s focus on the normal path.
Every routine this function calls maps directly to a hardware requirement:
VerifyRAMRequirements— enforces the 4 GB minimumVerifyProcessorSupported— enforces the CPU generation requirementVerifySecureBoot— enforces the Secure Boot requirementVerifyTPMSupported— enforces the TPM 2.0 requirement
These are not optional checks. There’s no other enforcement point in the installation flow.
How LabConfig Bypasses the Secure Boot Check
Let’s take a look at VerifySecureBoot. It first queries the actual hardware Secure Boot state through NtQuerySystemInformation. If the hardware reports Secure Boot as capable, the function returns TRUE immediately — that’s the normal path. The problem is what happens when the hardware check fails. The function doesn’t return FALSE. It falls through to a second check:
BOOLEAN VerifySecureBoot(void) {
    // Stage 1: Query actual hardware Secure Boot state
    QueryStatus = NtQuerySystemInformation(
        SystemSecureBootInformation,
        &SecureBootInfo, sizeof(SecureBootInfo), NULL
    );

    if (NT_SUCCESS(QueryStatus)) {
        IsNotCapable = (SecureBootInfo.SecureBootCapable != TRUE);

        if (IsNotCapable) {
            WdsSetupLogMessageW("VerifySecureBoot: Not capable of SecureBoot");
        } else {
            WdsSetupLogMessageW("VerifySecureBoot: Capable of SecureBoot");
        }

        // Hardware capable → return TRUE immediately, skip LabConfig check
        if (!IsNotCapable) {
            return TRUE;
        }
        // Hardware check failed — fall through to Stage 2
    }

    // Stage 2: Check LabConfig
    BypassValue = RegGetDword(
        HKEY_LOCAL_MACHINE,
        L"System\\Setup\\LabConfig",
        L"BypassSecureBootCheck"
    );

    if (BypassValue != 0) {
        WdsSetupLogMessageW(
            "VerifySecureBoot: SecureBoot check bypassed in lab environment");
    }

    // Caller cannot distinguish this TRUE from the hardware-verified TRUE above
    return (BOOLEAN)(BypassValue != 0);
}
When LabConfig kicks in, the function logs: “VerifySecureBoot: SecureBoot check bypassed in lab environment.”
Notice the phrase “lab environment” — this isn’t a random string. It reflects exactly what this code was originally designed for: Microsoft’s internal testing infrastructure. If this bypass was designed only for lab environments, why is it in production binaries shipped to every Windows 11 user?
How LabConfig Bypasses the TPM Check
The same structure appears in VerifyTPMSupported. If the TPM state can’t be determined, the function falls through to the same LabConfig check:
BOOL VerifyTPMSupported() {
    [...]
    WCHAR SupportState = L"SUPPORTED";
    if (!TPMResult) {
        SupportState = L"UNSUPPORTED";
    }

    if (Status == 0) {
        ConstructPartialMsgW("VerifyTPMSupported: TPM Version %s.", pwVar8);
    } else {
        ConstructPartialMsgW("VerifyTPMSupported: Tbsi_GetDeviceInfo function failed - 0x%08x",
            uVar4 & 0xffffffff);
    }
If the support state can’t be confirmed:
Status = RegGetDword(0x80000002, L"System\\Setup\\LabConfig", L"BypassTPMCheck");
if (Status != 0) {
    ConstructPartialMsgW("VerifyTPMSupported: TPM check bypassed in lab environment");
}
Same pattern, same “lab environment” string. Both checks, same fallback, same unconditional bypass.
setupcompat.dll — Keeping the System There
Once a system is installed through LabConfig, a new problem comes up: Windows 11 feature upgrades run their own hardware compatibility checks independently of the original installation. Without something extra, a LabConfig-installed system would get blocked from every subsequent upgrade, because it never satisfied the requirements to begin with.
The mechanism that keeps it running is in setupcompat.dll.
AllowUpgradesWithUnsupportedTPMOrCPU
While analyzing setupcompat.dll, I came across a registry key I hadn’t planned to look at: AllowUpgradesWithUnsupportedTPMOrCPU. Its name suggests a narrow scope — CPU and TPM. What it actually does is broader than that.
The IsBypassRegKeySet function exists purely to read and return the state of this key:
Status = RegGetDword(HKEY_LOCAL_MACHINE, L"SYSTEM\\Setup\\MoSetup",
    L"AllowUpgradesWithUnsupportedTPMOrCPU");
if (Status < 0) {
    return FALSE;
}
return (value != 0);
This return value feeds directly into AreHWRequirementsMet to bypass requirements. The function takes three inputs — ProductType, ScenarioStatus, and BypassStatus:
bypassStatus   = IsBypassRegKeySet();
scenarioStatus = GetInstallScenario();
result = AreHWRequirementsMet(productType, scenarioStatus, bypassStatus, ...);
GetInstallScenario reads a volatile value that setup.exe writes at startup:
HKLM\SYSTEM\Setup\MoSetup\Volatile
  └─ InstallScenario  (DWORD)  → value between 1 and 9
Once a valid product type is confirmed, the function selects an evaluation path based on these two inputs:
scenarioStatus == 4?
├─ YES  →  EvaluateHardwareRequirementV2()   (limited checks)
└─ NO
    ├─ bypassStatus != 0?
    │   ├─ YES  →  EvaluateHardwareRequirementV2()   (soft-check)
    │   └─ NO   →  EvaluateHardwareRequirement()     (full strict evaluation)
In code:
if (scenarioStatus == 4) {
    EvaluateHardwareRequirementV2(requirementSet, filterFlags, &results, &resultCount);
}
else if (bypassStatus != 0) {
    EvaluateHardwareRequirementV2(requirementSet, filterFlags, &results, &resultCount);
}
else {
    EvaluateHardwareRequirement(requirementSet, filterFlags, &results, &resultCount);
}
EvaluateHardwareRequirementV2 checks hardware with soft conditions — if the hardware is present but the version is old, it still accepts the system. The strict EvaluateHardwareRequirement does the opposite: if versions don’t match, it blocks.
So Scenario 4 routes through the soft check. What’s Scenario 4? Let’s look at setupprep.exe’s CreateCommandLine function:
CommandArgument = *(int *)(param_1 + 0x74);
if (CommandArgument == 1) {
    ScenarioValue = L"/Media %s";
}
else if (CommandArgument == 2) {
    ScenarioValue = L"/Recovery %s";
}
else if (CommandArgument == 4) {
    ScenarioValue = L"/Boot %s";
}
else if (CommandArgument == 5) {
    ScenarioValue = L"/Update %s";
}
else if (CommandArgument == 6) {
    ScenarioValue = L"/Package %s";
}
else if (CommandArgument == 7) {
    ScenarioValue = L"/Web %s";
}
else if (CommandArgument == 8) {
    ScenarioValue = L"/AzureHost %s";
}
else {
    if (CommandArgument != 9) {
        goto Exit;
    }
    ScenarioValue = L"/Servicing %s";
}
Scenario 4 is the /Boot path — the path every user takes when they boot from Windows 11 installation media and click through normally. Scenario 4 is the default installation path.
OnInvoke — The Per-Requirement Override
After AreHWRequirementsMet returns, OnInvoke iterates over every entry in the result array. For each failed requirement, it checks whether a per-requirement override is possible. This override stage is only reachable when scenarioStatus == 4:
for (currentRequirement = firstResult; currentRequirement != lastResult; currentRequirement++) {
    if (currentRequirement->evaluationResult == 0) {     // requirement FAILED
        if (GetInstallScenario() == 4) {
            if      (wcscmp(requirementName, L"Memory")         == 0) bypassKey = L"BypassRAMCheck";
            else if (wcscmp(requirementName, L"UefiSecureBoot") == 0) bypassKey = L"BypassSecureBootCheck";
            else if (wcscmp(requirementName, L"TpmVersion")     == 0) bypassKey = L"BypassTPMCheck";
            else goto HardBlock;

            ShouldOverrideCompatCheck(TargetBypassKey, &overrideAllowed);

            if (overrideAllowed) {
                currentRequirement->evaluationResult = 1;  // mark as PASSED
                // logs: "%s check is bypassed in lab environment."
            }
        }

        if (currentRequirement->evaluationResult == 0) {
            ReportIssue(HardBlock);
        }
    }
    else {
        ReportIssue(NoIssue);
    }
}
ShouldOverrideCompatCheck reads LabConfig:
HKLM\SYSTEM\Setup\LabConfig
  └─ BypassTPMCheck
  └─ BypassRAMCheck
  └─ BypassSecureBootCheck
Notice something: the key is named AllowUpgradesWithUnsupportedTPMOrCPU, but the code that reads it also covers Secure Boot. That behavior isn’t reflected anywhere in the key’s name or any public documentation.
Testing on My X230
I tested all of this on my old Lenovo X230 laptop. It has a TPM 1.2 and a processor that doesn’t meet Windows 11 requirements — perfect test subject.
Scenario 4 in Action
From the analysis, InstallScenario is set to 4 in the normal installation scenario. Let’s verify:

After running setup.exe /boot:
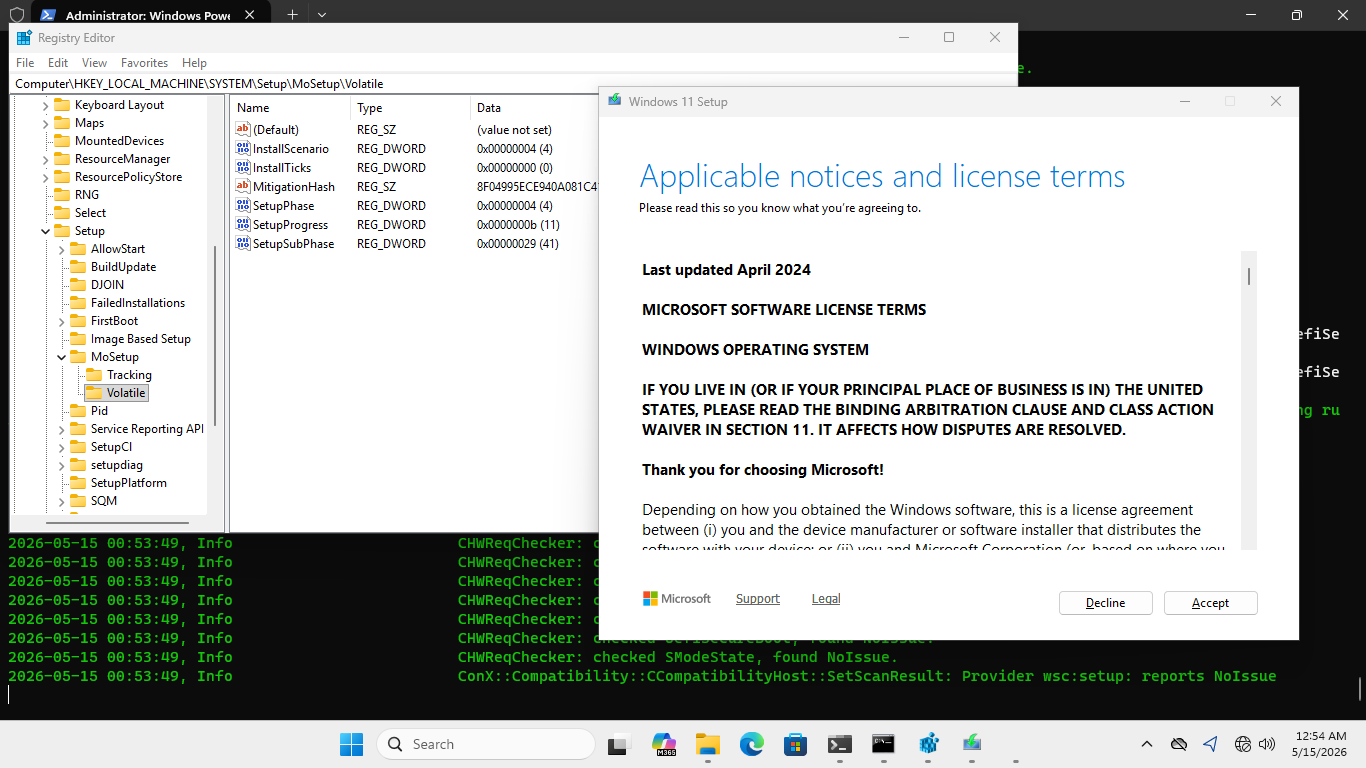
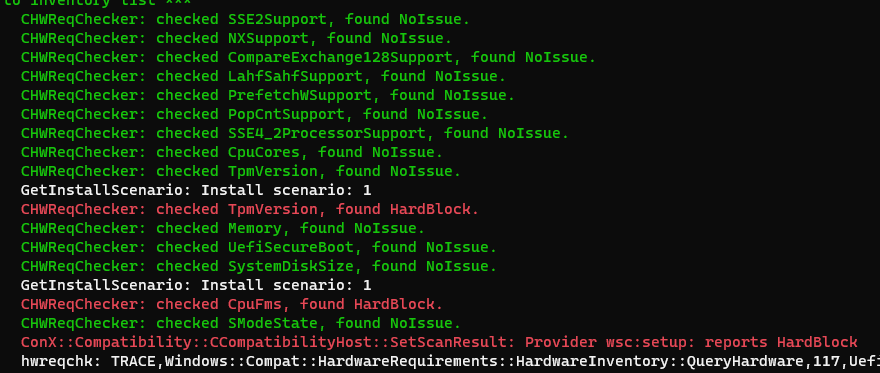
The logs:
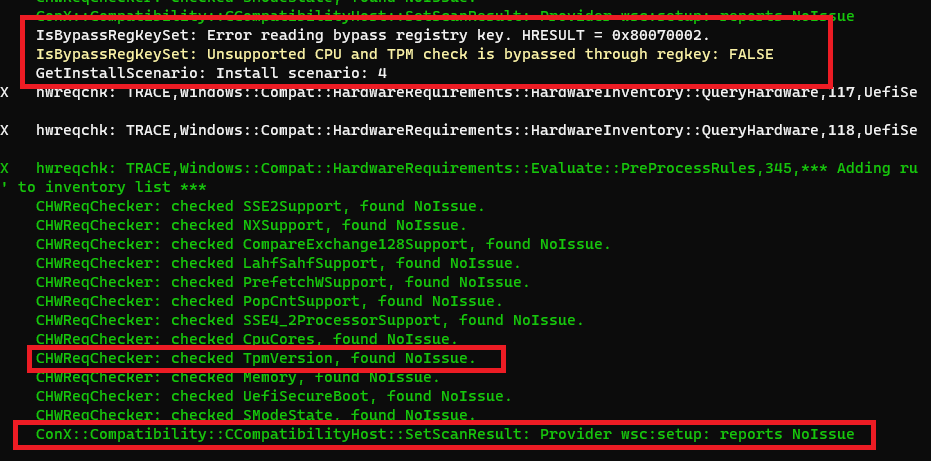
As you can see, setup.exe doesn’t check the TPM version for Scenario 4. Even though Microsoft states that TPM 2.0 is required for Windows 11, only the presence of a TPM is verified here — not the version.
Focus on the “NoIssue” text in the log. It checks the hardware, finds something present, and accepts it — even if it’s TPM 1.2. The TPM 2.0 requirement is completely bypassed this way.
We can verify with the X230’s actual TPM:
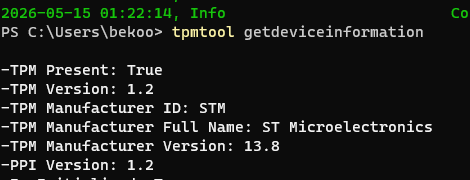
TPM 1.2. Now let’s remove the TPM in a Windows 11 VM and run setup.exe /boot:
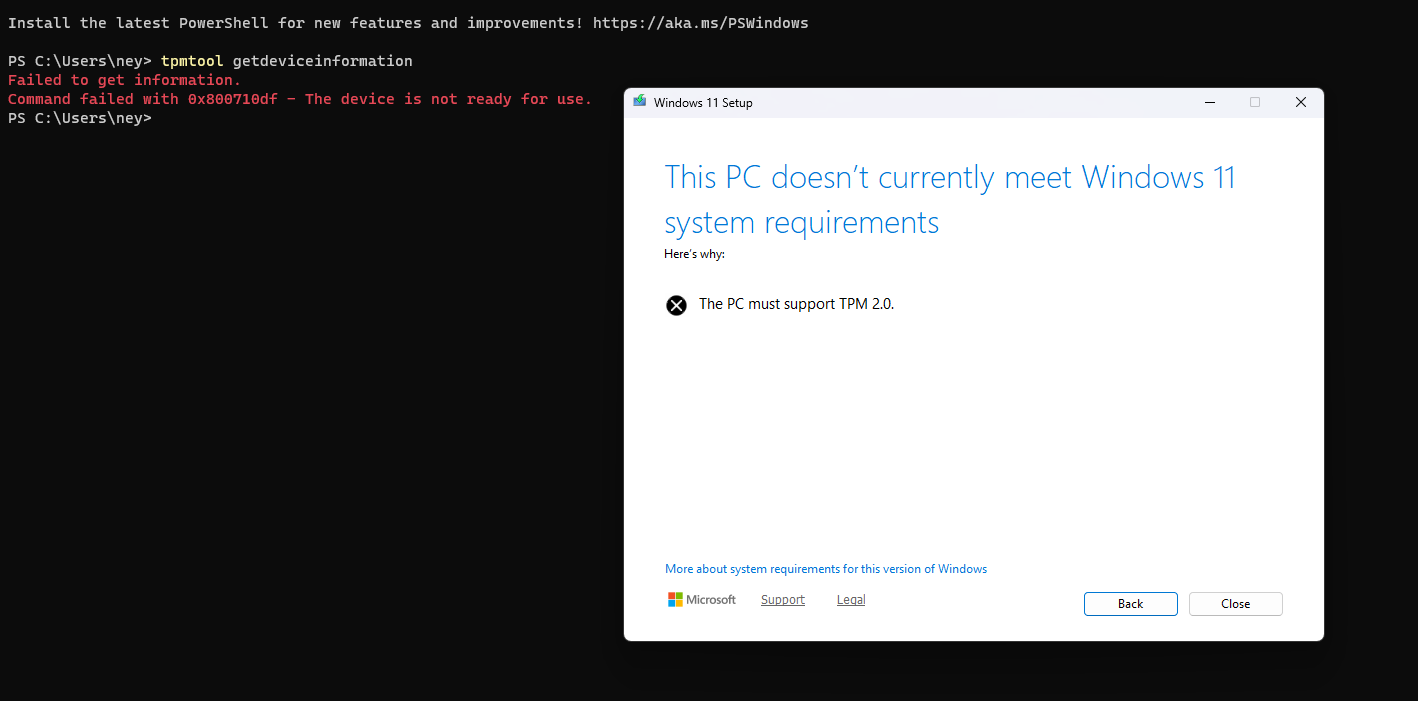
For Scenario 4, setup.exe only checks whether a TPM exists at all. No version check.
Scenario 1 for Comparison
Scenario 1 normally belongs to the /auto upgrade path, but I changed InstallScenario to 1 under the /boot option to show the difference from Scenario 4. The value isn’t protected, so we can change it freely.
After running setup.exe /boot and switching the value to 1:
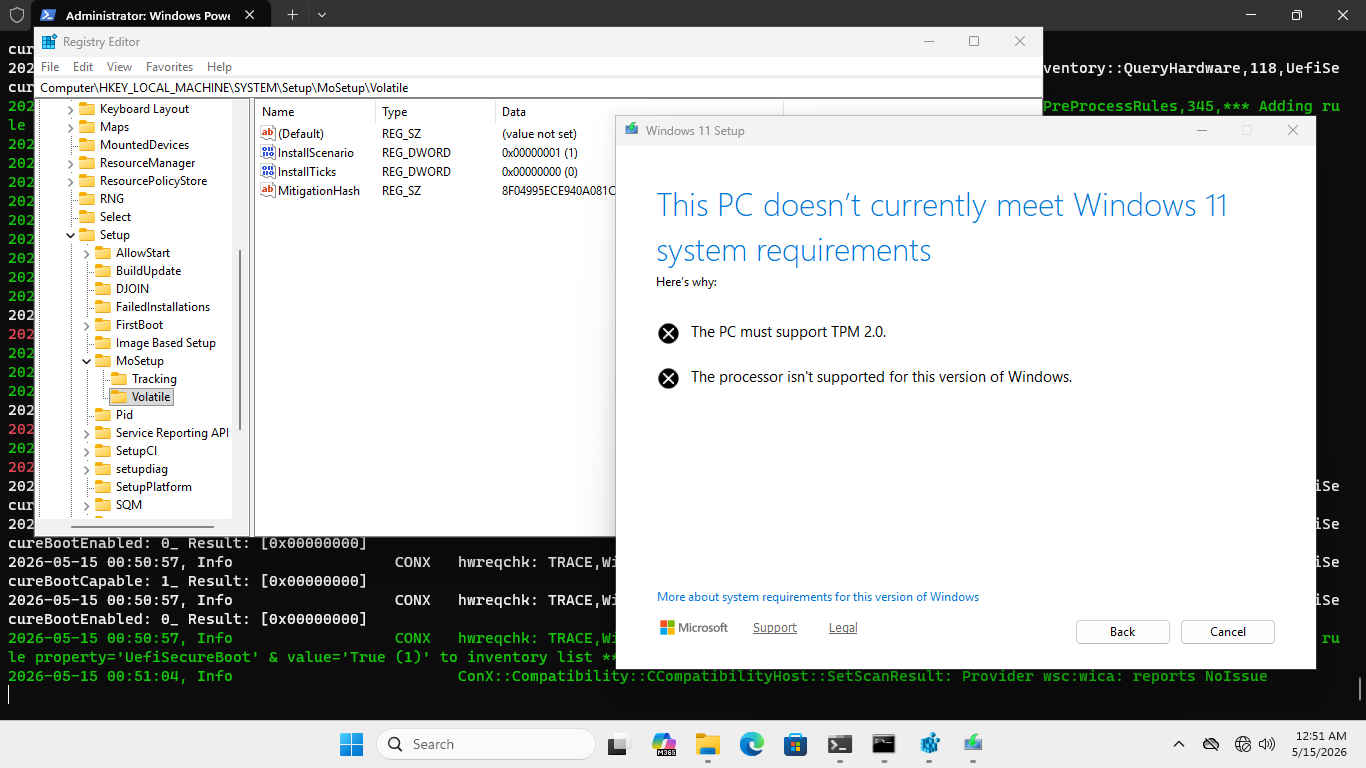
This is what the check is supposed to look like. When the scenario isn’t Scenario 4, all the necessary checks are performed. The X230’s TPM 1.2 and unsupported processor are both caught:
It logs the hardware as ‘HardBlock’. But the exact opposite happens during a normal Windows 11 installation.
So what we’re looking at is Microsoft carrying Windows 10’s setup logic into Windows 11 without updating it to actually enforce the security requirements they publicly committed to.
winload.efi — What Happens at Every Boot After
Everything above describes how a system gets into a non-compliant state. Now let’s look at what that state actually means at boot time — permanently.
winload.efi has no knowledge of how the system was installed, which registry keys were set, or which checks were bypassed during setup. It works with what it finds at runtime: the Secure Boot state reported by firmware, the TPM version detected by the TCG protocol stack, and the boot environment as it exists at that exact moment. On a LabConfig-installed system, what it finds is always the same — Secure Boot absent, TPM version insufficient or absent.
winload.efi responds to these conditions exactly as it was designed to — it degrades gracefully. The problem isn’t that winload.efi is doing something wrong. The problem is that its correct behavior, applied to a LabConfig-installed system, permanently disables the security features Windows 11 is supposed to be built on.
VBS Policy — Secure Boot Controls Whether HVCI and Credential Guard Initialize
BlVsmSetSystemPolicy constructs BlVsmpSystemPolicy — the global value that controls whether HVCI, Kernel DMA Protection, Credential Guard, and Secure Launch will initialize. Its behavior is entirely conditional on the Secure Boot state it finds at boot time:
// Inside BlVsmSetSystemPolicy @ 0x1801bdf7c

int  sbQueryResult = SbIsEnabled2(1, local_res10);
char sbEnabled     = local_res10[0];
if (sbQueryResult < 0) {
    sbEnabled = '\0';
}
When Secure Boot is active (sbEnabled != 0), the function reads the VbsPolicy UEFI NVRAM variable from the Secure Boot private namespace, evaluates it against hardware capabilities, and writes the result back:
// Secure Boot active path
int vbsPolicyResult = BlSecureBootGetBootPrivateVariable(
    L"VbsPolicy", &vbsPolicyData, &vbsPolicySize
);
// bit 0x600 → HVCI + Kernel DMA Protection
// bit 0x080 → Secure Launch (DRTM)
// bit 0x040 → Credential Guard
BlSecureBootEFISetVariable(L"VbsPolicy", assembledPolicy, 3, 8, &policyBlock);
When Secure Boot is disabled, the function takes a completely different path:
// Secure Boot disabled path
if (sbEnabled == '\0') {
    BlVsmpSystemPolicy = 2;   // hard-coded minimal stub
    return 0;                 // function exits — nothing else runs
}
BlVsmpSystemPolicy = 2 is a minimal stub value. The VbsPolicy NVRAM variable is never consulted, never verified, never updated. HVCI, Kernel DMA Protection, Secure Launch, and Credential Guard don’t initialize — not because the hardware doesn’t support them, but because the policy that would have enabled them was never assembled.
Every boot on a LabConfig-installed system produces BlVsmpSystemPolicy = 2. Permanently.
VSM Loader Block — What winload.efi Reports to the Kernel
The VSM Loader Block is the data structure winload.efi constructs and passes to the kernel to describe the boot-time security environment. OslpVsmInitializeLoaderBlock assembles a flags field at offset +0x5a0 of OslVsmLoaderBlock. Bit 0x10 marks the boot environment as Secure Boot authenticated:
// Inside OslpVsmInitializeLoaderBlock @ 0x180026950

int  sbQueryResult    = SbIsEnabled2(0, &local_res10);
char sbActive         = (char)local_res10;
uint authenticatedFlag = 0;

if ((sbQueryResult >= 0) && (sbActive != '\0')) {
    int  testRootResult   = SbIsTestRootTrusted(&local_res18);
    char testRootBlocked  = '\0';
    if (testRootResult < 0 || local_res18[0] == '\0') {
        testRootBlocked = SbIsTestSigningBlocked();
    }
    if (testRootBlocked == '\0') {
        authenticatedFlag = 0x10;   // authenticated flag SET
    }
}

*(uint*)((longlong)OslVsmLoaderBlock + 0x5a0) |= authenticatedFlag;
On a LabConfig-installed system, sbActive = 0, authenticatedFlag stays zero, and the 0x10 bit is never written. The same field carries the following bits, all of which stay zero:
| Bit | Meaning |
|---|---|
| 0x0010 | Secure Boot authenticated |
| 0x0040 | TPM-bound LKey present |
| 0x0080 | DRTM / Secure Launch active |
| 0x4000 | Kernel DMA Protection active |
| 0x8000 | VSM LKey provisioned |
OslpVsmInitializeSecureCoreInfo encodes the TPM version detected during boot into OslVsmLoaderBlock at offset +0x744, passing it to the kernel as SecureCoreInfo.TpmVersion:
// Inside OslpVsmInitializeSecureCoreInfo @ 0x1800267e4

// DAT_180339fc8: 0 = no TPM, 1 = TPM 1.2, 2 = TPM 2.0
*(uint*)((longlong)OslVsmLoaderBlock + 0x744) =
    (uint)(byte)tpmVersion << 8
    | sbAuthFlags
    | -(uint)(lkeyBoundFlag != '\0') & 0x40;
tpmVersion is populated by BlpTpmInitialize, which probes the firmware for TCG protocol implementations:
// Inside BlpTpmInitialize @ 0x1801ab064

int tpm20Result = BlTpmpAcquireProtocol(&BlTpmpTcg20Implementation);
if (tpm20Result < 0) {
    BlTpmpAcquireProtocol(&BlTpmpTcg12Implementation);
}
// tpmVersion = 0 → no TPM
// tpmVersion = 1 → TPM 1.2
// tpmVersion = 2 → TPM 2.0
Let’s check the kernel-visible TPM version field across three test systems:
| System | tpmVersion | OslVsmLoaderBlock+0x744 | tpm.msc result |
|---|---|---|---|
| X230 (TPM 1.2, LabConfig) | 1 | 0x0100 | Inactive / Not manageable |
| VMware (no TPM, LabConfig) | 0 | 0x0000 | Not found |
| Clean install (TPM 2.0, SB active) | 2 | 0x0200 | Ready |
As you can see, this explains why TPM shows as inactive in tpm.msc on LabConfig-installed systems regardless of what hardware is physically present.
SRK Provisioning — Why BitLocker TPM Binding Doesn’t Work
The Storage Root Key (SRK) is the TPM 2.0 primary key under which all other security keys — BitLocker Volume Master Keys, Windows Hello credentials, VBS LKeys — are sealed. Without it, none of those keys can be created or accessed.
OslpProvisionTpmSrk is responsible for creating the SRK during boot. It starts with an unconditional version guard:
// Inside OslpProvisionTpmSrk @ 0x1800392a4

void OslpProvisionTpmSrk(void) {
    if (tpmVersion != 2) {
        return;   // Not TPM 2.0 — silent return, no ETW event
    }

    int  aes256Result  = TpmApiTestAes256Capability20(0);
    char aes256Capable = (aes256Result >> 0x1f & 1U) + 1;

    int  rsa3kResult  = TpmApiTestRsa3kCapability20(0);
    char rsa3kCapable = (rsa3kResult >> 0x1f & 1U) + 1;

    int srkHandle = 0;
    TpmW8ApiCreateSrk20(
        (HTPMCONTEXT__*)0x0, &srkHandle,
        (uint)(aes256Capable == 1),
        (uint)(rsa3kCapable  == 1)
    );
}
If tpmVersion != 2, the function returns immediately. No fallback, no warning, no ETW event. The SRK simply doesn’t exist.
| System | tpmVersion | SRK Created | BitLocker TPM Binding | tpm.msc |
|---|---|---|---|---|
| X230 (TPM 1.2, LabConfig) | 1 | No | No | Inactive |
| VMware (no TPM, LabConfig) | 0 | No | No | Not found |
| Clean install (TPM 2.0, SB active) | 2 | Yes | Active | Ready |
LabConfig let setup.exe skip the TPM version check at installation. winload.efi unconditionally enforces TPM 2.0 for SRK provisioning — it has no idea the system was installed under lab conditions. The result: installation succeeded, but the TPM security chain is permanently broken from the first post-installation boot onward.
TPM Binding Termination — BitLocker Loses Its PCR11 Measurement
All BitLocker-related TPM operations in winload.efi are gated by a bitmask state variable fveStateBitmask. The gatekeeper function is FvebpCanUseTpm:
// Inside FvebpCanUseTpm @ 0x18004e42c

uint FvebpCanUseTpm(void) {
    if (
        (fveStateBitmask >> 9  & 1) != 0 &&    // bit 9:  TPM initialized
        (fveStateBitmask >> 10 & 1) == 0 &&    // bit 10: no TPM hardware error
        (fveStateBitmask >> 11 & 1) == 0 &&    // bit 11: TPM not reported absent
        (fveStateBitmask >> 12 & 1) == 0 &&    // bit 12: binding not explicitly disabled
        (fveStateBitmask >> 13 & 1) == 0       // bit 13: binding not force-ended
    ) {
        return 1;   // TPM usable
    }
    return 0;
}
When Secure Boot is disabled, BlFveSecureBootCheckpointInsecure is called instead of BlFveSecureBootCheckpointBootApp. This marks the boot as insecure and calls FvebpEndTpmBindingEx with skipPcrExtend = 1:
// Inside BlFveSecureBootCheckpointInsecure @ 0x18004ba48

int BlFveSecureBootCheckpointInsecure(char param_1) {
    if (param_1 != '\0') {
        fveStateBitmask |= 0x40000;   // insecure boot flag
    }
    FvebpEndTpmBindingEx(
        -(uint)(param_1 != '\0') + 2,   // 2 = insecure-end
        1                                // skipPcrExtend = 1
    );
}
Inside FvebpEndTpmBindingEx, the skipPcrExtend parameter determines whether PCR11 gets extended:
// Inside FvebpEndTpmBindingEx @ 0x18004d440

// Secure Boot active path (skipPcrExtend = 0):
SipaCheckBitLockerPcrCapped();
SipaLogBitLockerCap();
if (tpmVersion == 1) {
    Tpm12ApiExtendPCR(&FvebGlobalData, &pcr11ExtendData);
} else if (tpmVersion == 2) {
    TpmApiExtendPCR20(&FvebGlobalData, 0xb, &pcr11ExtendData);  // PCR index 11
}

// Secure Boot disabled path (skipPcrExtend = 1):
// PCR extension calls are never reached.

// Both paths:
fveStateBitmask |= 0x2000;   // binding "completed" flag — set regardless
Notice the binding completion flag 0x2000 is set in both paths. Any caller reading fveStateBitmask sees a completed binding. But with skipPcrExtend = 1, PCR11 is never extended — the TPM binding record is closed without a valid measurement. BitLocker cannot verify the boot environment against TPM-sealed state.
The system reports a completed TPM binding. That binding carries no actual measurement of the boot environment. There’s no user-visible indication of any of this, and no standard diagnostic tool surfaces it.
Unsafe DLL Loading in setupprep.exe
While I was at it, I also noticed something in setupprep.exe worth mentioning. It’s in LoadReserveMgrModule:
Status = CombinePath(Pathdirectory, L"ReserveManager.dll", 0x0, &local_res8);
if (Status < 0) {
    CheckToBreakOnFailure(Status);
    LibraryAddr = 0x0;
} else {
    LibraryAddr = LoadLibraryExW(local_res8, (HANDLE)0x0, 0);
    if (LibraryAddr == 0x0) {
        Status = GetLastError();
        goto exit;
    }
}
The function constructs a path from the setup directory and immediately loads whatever DLL it finds there. No flags restricting loading to a known-safe path, no signature verification, nothing. A DLL placed in the sources directory of a mounted or extracted ISO as ReserveManager.dll gets loaded and executed with the same privileges as setup.exe, which runs as administrator.

To be clear — this doesn’t yield a practical attack surface in real-world scenarios, since triggering it requires the ability to modify installation media contents. I’m including it as another data point about the overall state of this setup stack.
WhiteLotus
Everything above describes how to end up with a system where Secure Boot is absent and the boot chain offers no resistance. The natural question is: what can an attacker actually do with that?
I built WhiteLotus to answer that. It’s a UEFI bootkit that runs entirely in this space. It doesn’t bypass Secure Boot — it doesn’t need to. It just takes advantage of the space that LabConfig creates.
The capabilities it exercises — pre-kernel code execution, DSE bypass, unsigned driver loading — are the direct consequence of the conditions documented above. Every system installed through LabConfig is a system where these capabilities are available to any attacker who can write to the EFI System Partition.
You can read the full technical walkthrough here: WhiteLotus — Walking Through a UEFI Bootkit
Conclusions
These findings aren’t isolated bugs. They’re the result of a setup stack being carried forward from Windows 10 into Windows 11 without being updated to reflect the security commitments that came with it.
A few things that should change:
LabConfig shouldn’t be in production binaries. It was designed for internal lab environments. Its presence in winsetup.dll and setupcompat.dll is inconsistent with what Windows 11 publicly commits to. If it needs to stay for internal tooling, gate it behind a build-time flag that isn’t in retail binaries. The specific values that should be removed or restricted: BypassSecureBootCheck, BypassTPMCheck, BypassRAMCheck, BypassStorageCheck, BypassCPUCheck.
Scenario 4 needs to actually check TPM version. The default installation path routes through EvaluateHardwareRequirementV2, which checks for TPM presence but not version. TPM 1.2 passes without error. Windows 11 requires TPM 2.0. The strict evaluation path — EvaluateHardwareRequirement — already exists and is already implemented. It’s just not called on the default path.
AllowUpgradesWithUnsupportedTPMOrCPU needs an audit. It was designed for systems with unsupported CPUs or older TPM hardware. In the context of everything above, it becomes the mechanism that makes a LabConfig-installed system permanent. LabConfig handles installation-time bypass, this key handles upgrade-time bypass. Together, a non-compliant system can stay on Windows 11 indefinitely.
Users should be told at boot time. A system installed through LabConfig boots normally, receives updates, and runs indefinitely with no indication that its security posture is compromised. The kernel receives BlVsmpSystemPolicy = 2. HVCI and Credential Guard don’t initialize. BitLocker can’t bind to the TPM. None of this is surfaced anywhere. The infrastructure to detect a non-compliant boot environment already exists in bootmgfw.efi — what’s missing is any response beyond silently degrading the security posture.
These recommendations will predictably land on someone’s desk as “this would break millions of Windows 11 installations.” That concern is real. But the current state — a product that publicly guarantees security properties that a large fraction of its user base never actually has — is also a real concern. Just one that’s currently invisible.